
DocumentationChapter 07 of 14
07User guide
This part explains each screen. You see only the screens and buttons that your role allows. If a screen in this guide is missing for you, ask your administrator.
Screen layout
- The menu on the left has four groups. Maintenance: Dashboard, Work orders, Requests, Preventive maintenance, Assets, and Downtime. Stock: Spare parts, Purchasing, and Vendors. Insights: Reports. Admin: Users and roles, Audit trail, and Settings. The menu button in the top bar hides and shows the menu. On a small screen, it opens the menu.
- The site picker (Site) in the top bar chooses which data you see: the data of one site, or of All my sites. MaintDock remembers your choice. A user with only one site does not need to pick.
- The search box finds work orders, assets, and more. See Global search.
- The light and dark button switches the mode. See Light and dark mode.
- The bell shows your notifications. See Notifications.
- Your name opens a menu with My profile, Change password, Notification settings, Phone view, and Sign out.
Most lists have tabs, a search box, filters, and pages. Lists refresh by themselves when other users change data. Many lists have Export to Excel, and work orders, purchase orders, labels, and reports print as PDF.
Dashboard
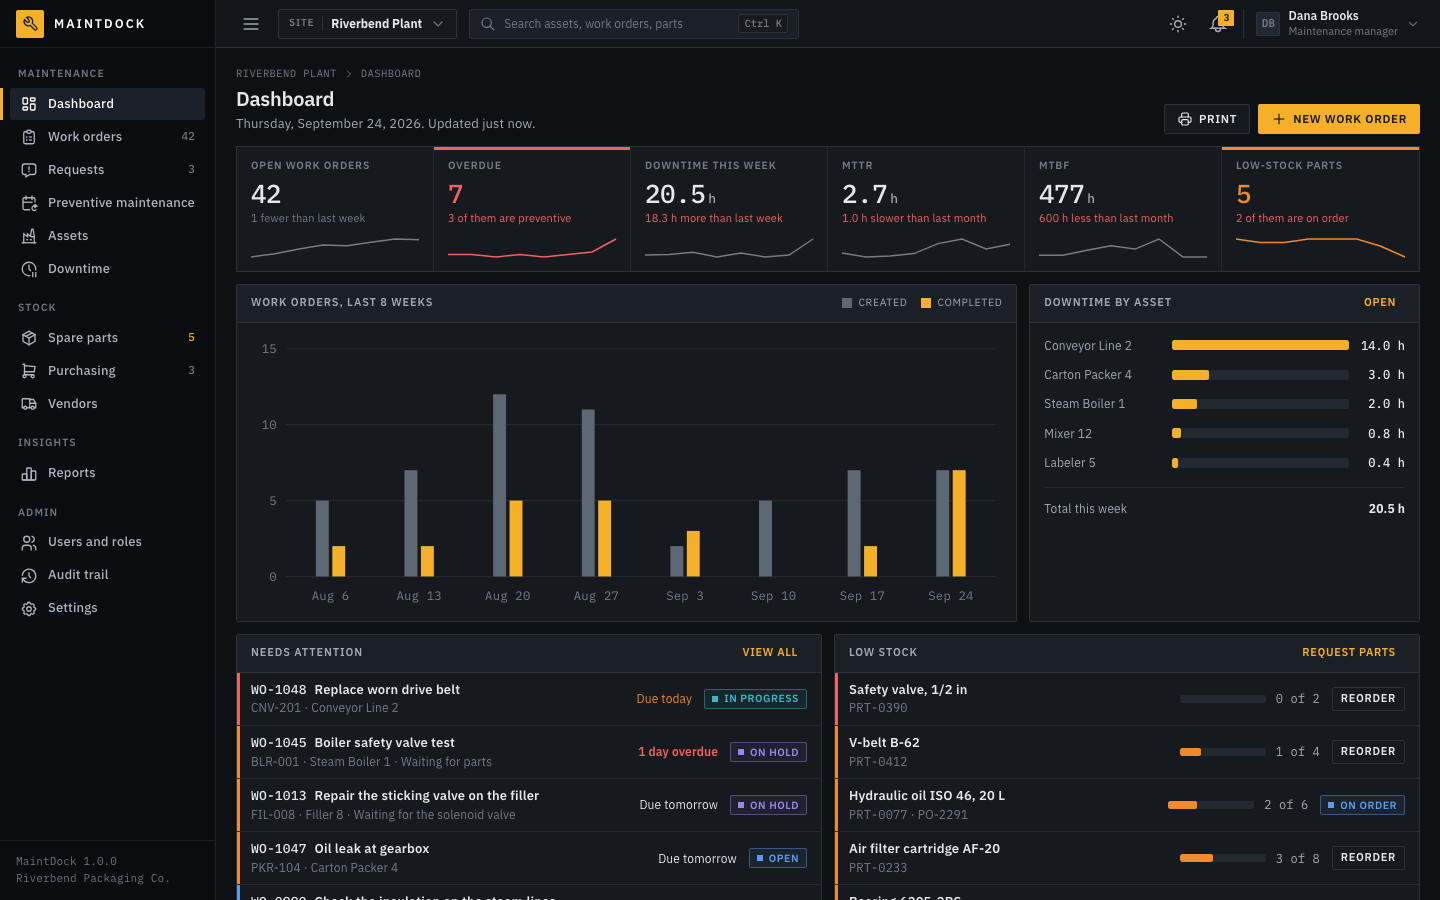
The dashboard is the first page after sign-in. It shows the state of maintenance at the site you picked.
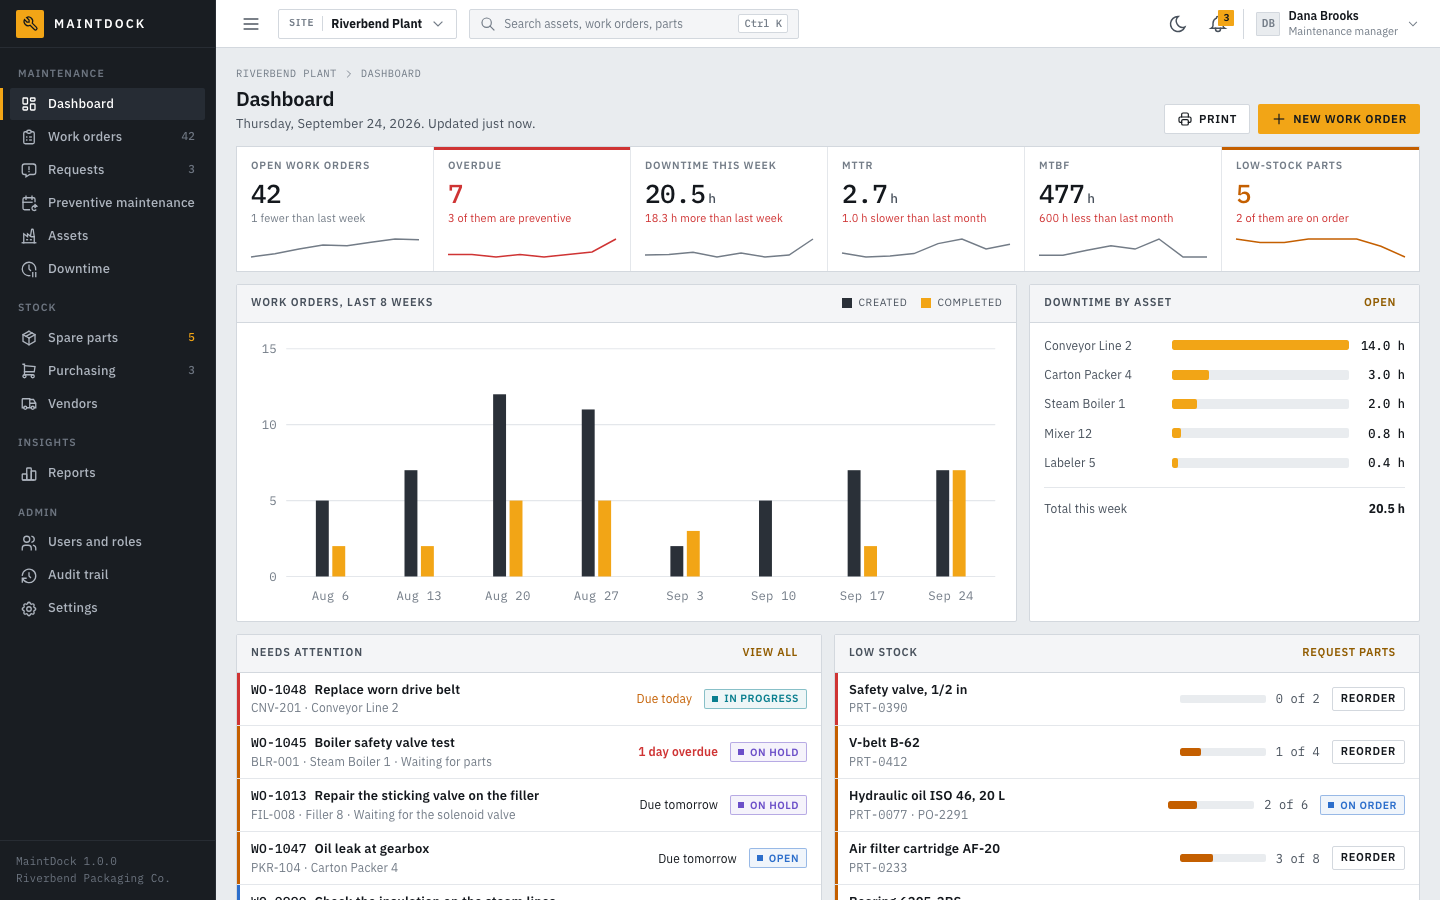
- Key numbers: open work orders (with the change from last week), overdue work orders (with how many of them are preventive), downtime this week (with the change from last week), MTTR and MTBF of the last 30 days (with the change from the 30 days before), and low-stock parts (with how many of them are on order).
- Work orders, last 8 weeks: a chart of work orders created and completed each week.
- Downtime by asset: the 5 assets with the most downtime this week.
- Needs attention: open work that is overdue, due today or tomorrow, or critical.
- Low stock: parts below their minimum stock, with a Reorder button, and Request parts for all of them.
You see only the parts that your role allows. For example, the downtime numbers need Downtime: View, and the low-stock parts need Spare parts: View.
Use New work order to add work, and Print to print the page. The dashboard is about work orders. People whose role cannot see work orders (for example the Requester role) go to the Requests page after sign-in instead (on a phone, to the phone view). There they see the requests of their sites and the Report a problem button.
Work orders
A work order is a job for the maintenance team: a repair, a service, an inspection, or another task. Open Work orders to see the list.
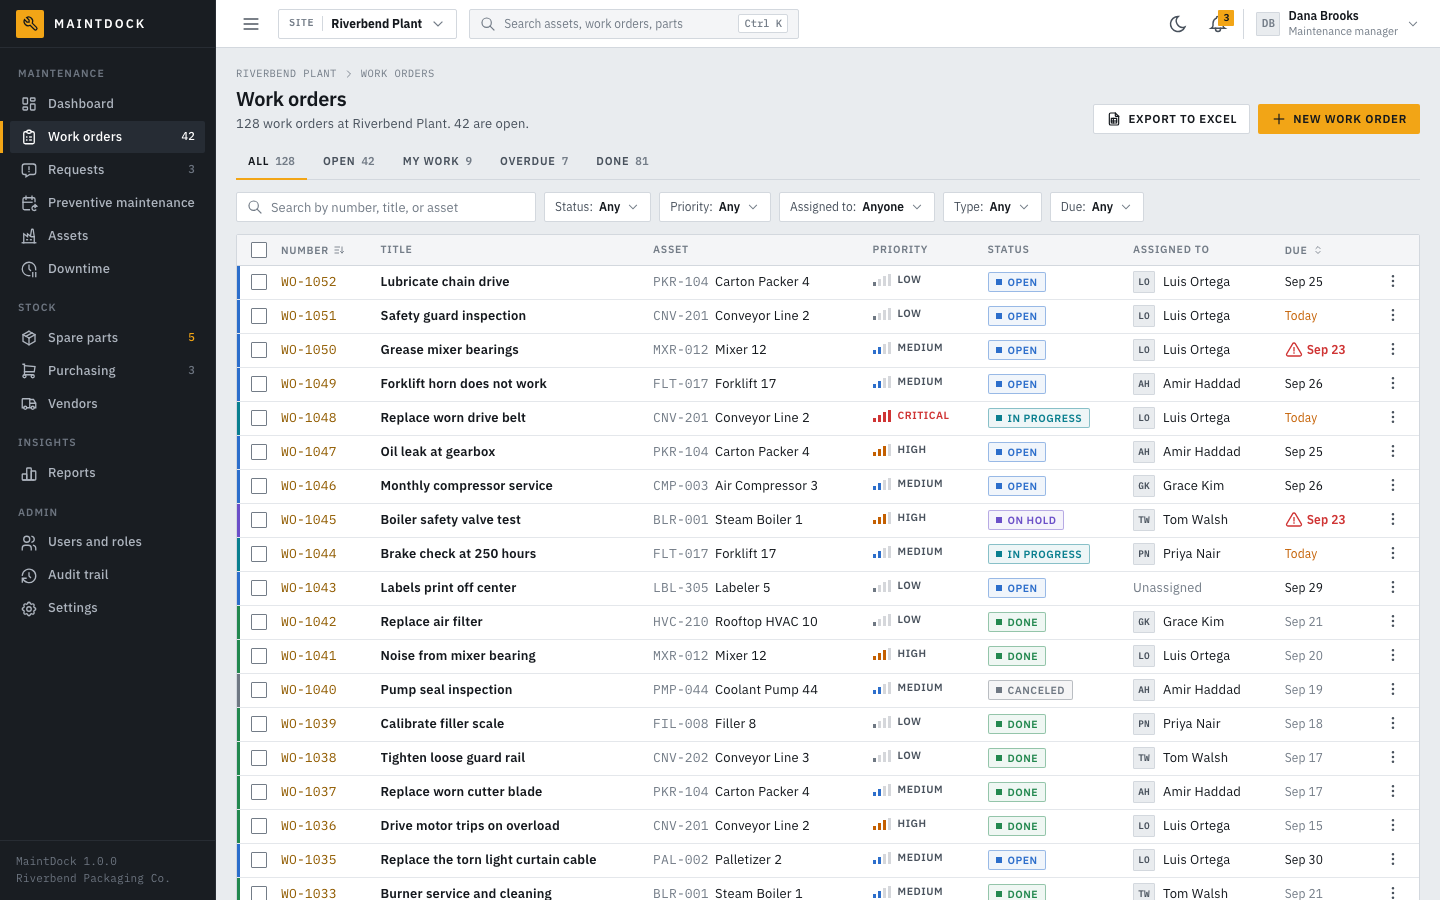
The list
- Tabs: All, Open, My work (assigned to you), Overdue, and Done.
- Search by number, title, or asset. Filters: Status, Priority, Assigned to, Type, and Due (Overdue, Today, This week, This month, Next 30 days).
- Select rows with the check boxes to assign, change the status, or export many work orders at once.
- The actions button at the end of a row has Open, Assign, Change status, Print PDF, and Delete.
Create a work order
Click New work order and fill in the form:
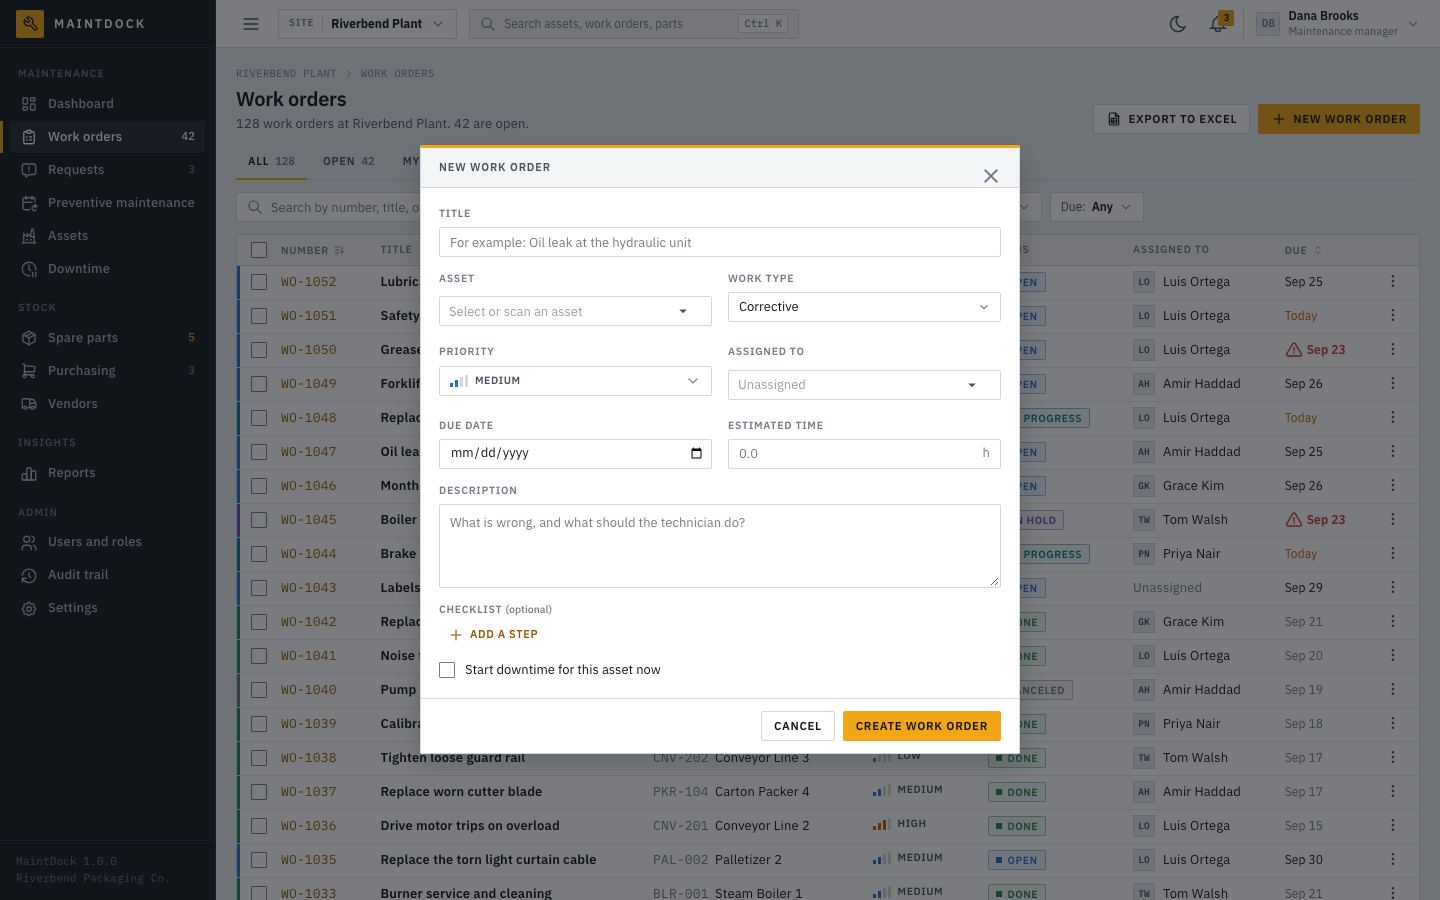
- Title, for example Oil leak at the hydraulic unit.
- Asset. When the work is not on an asset, leave it empty. The work order then belongs to the site you picked in the top bar. When you see All my sites, a Site field shows, and you pick the site there.
- Work type: Corrective, Preventive, Inspection, Safety, or Improvement.
- Priority: Low, Medium, High, or Critical. The bars next to the priority show it at a glance. The first value comes from Settings > General > Default priority.
- Assigned to (the list shows the people who may edit work orders at that site), Due date, Estimated time in hours, and Description (what is wrong, and what the technician should do).
- Checklist (optional): click Add a step for each step of the job.
- Start downtime for this asset now: tick it when the machine is stopped. It needs Downtime: Create. See Downtime.
Click Create work order. Work orders get a number such as WO-1048. You can change the numbering in Settings > Numbering.
The work order page
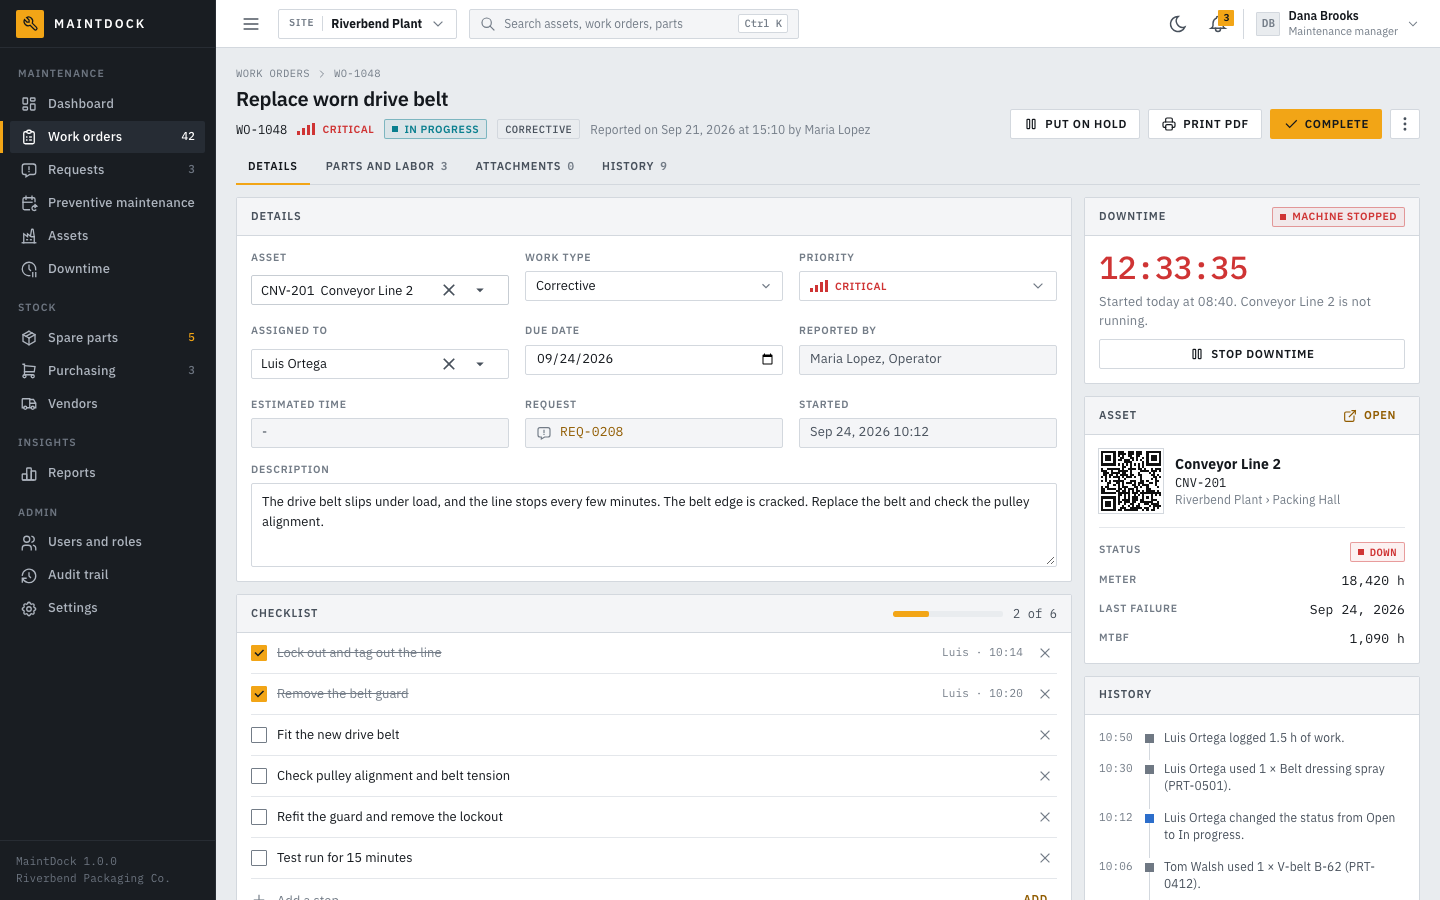
The page shows the number, priority, status, and work type at the top, and the buttons for the next step. The tabs Details, Parts and labor, Attachments, and History move the page to that part.
- Details: the asset, work type, priority, assignee, due date, who reported the work, the estimated time, and the description. You can change the asset, work type, priority, assignee, due date, and description here. Each change saves at once. To change the title or the estimated time, use Edit in the More actions menu.
- Checklist: the steps of the job. Tick each step when it is done. MaintDock shows who ticked it and when. Ticking a step of an open work order moves it to In progress. Add or remove steps as needed. Work orders from a preventive schedule get the checklist of the schedule.
- Parts and labor:
- Add part takes a spare part out of a store (this is called an issue). You pick the part, the store, and the quantity. You cannot take more than the store has. The part is charged at its average unit cost.
- Return to stock (in the actions of a part line) removes the line and puts the quantity back into the store.
- Log time adds work hours for a person (up to 24 hours per entry), with an optional note. The labor cost is the hours times the person's hourly rate.
- The total cost is the parts plus the labor.
- Job timer: technicians start and stop the job timer in the phone view. Each person has one timer at a time. Starting it moves an open or on-hold work order to In progress, and it stops the person's timer on any other work order. When a timer stops, its time is logged as labor. On the desktop, a running timer shows as a labor line with a live clock. Use Stop my timer in the actions of that line to stop your own timer. Putting a work order on hold, canceling it, or completing it stops all running timers.
- Attachments: upload photos, manuals, and other files. The allowed file types and the largest file size are set in Settings > Files. Photos (JPG, PNG, GIF, WebP), PDF files, and TXT files open in the browser. Other files, for example SVG, CSV, or Word files, download instead, so a harmful script in a file cannot run in MaintDock.
- Downtime: shows whether the machine is stopped, with a live clock. Use Start downtime and Stop downtime here. When the asset is already down for another reason, Link it to this work order links that downtime.
- Asset: a short card with the status, the meter reading, the last failure, and the MTBF of the asset.
- History: a timeline of everything that happened to the work order.
Use Print PDF to print the work order, for example for a technician without a phone. A closed or canceled work order is read-only until someone reopens it.
The status of a work order
| Status | Meaning |
|---|---|
| Open | Waiting for someone to start. |
| In progress | Someone works on it now. |
| On hold | The work stopped for a while, for example to wait for a spare part. |
| Done | The work is finished. |
| Closed | A manager checked the finished work. |
| Canceled | The work is not needed. |
- Start work (or starting the job timer, or ticking a checklist step) moves the work order to In progress. On hold is not a dead end: Resume work moves it back to In progress.
- Put on hold asks why the work stopped. The reason is required when the setting Ask for a note when a work order is put on hold is on (it is on by default). For an open work order, Put on hold is in the More actions menu.
- Complete sets the status to Done. You can add completion notes, and a meter reading when the asset has a meter. The dialog warns you when checklist steps are not done. When you complete a work order, MaintDock:
- stops the running job timers and logs their time,
- stops the running downtime of the work order,
- saves the meter reading, if you entered one,
- moves the preventive schedule to its next due date, if the work order came from one,
- tells the person who reported or created the work order.
- Close is for a manager who checked the work. Only a Done work order can be closed. It needs the permission Work orders: Approve. MaintDock can also close completed work orders by itself after a number of days (Settings > General > Close completed work orders after).
- Cancel work order (under More actions) is for work that is not needed. It also stops the running downtime of the work order. A canceled work order cannot be completed. Reopen it first.
- Reopen moves a Done, Closed, or Canceled work order back to Open. Reopening a Done or Canceled work order needs Work orders: Edit. Reopening a closed work order needs Work orders: Approve.
- Delete (under More actions) removes the work order with its checklist, time entries, files, and history. It needs Work orders: Delete. A work order that had parts issued to it cannot be deleted. Cancel it instead.
All other status changes need Work orders: Edit. In the list, Change status changes the status of one or many work orders at once, with the same rules.
Requests
A request is a problem report. Operators and other staff report a problem, and a manager decides what to do. Only signed-in users can report a problem. There is no public form.
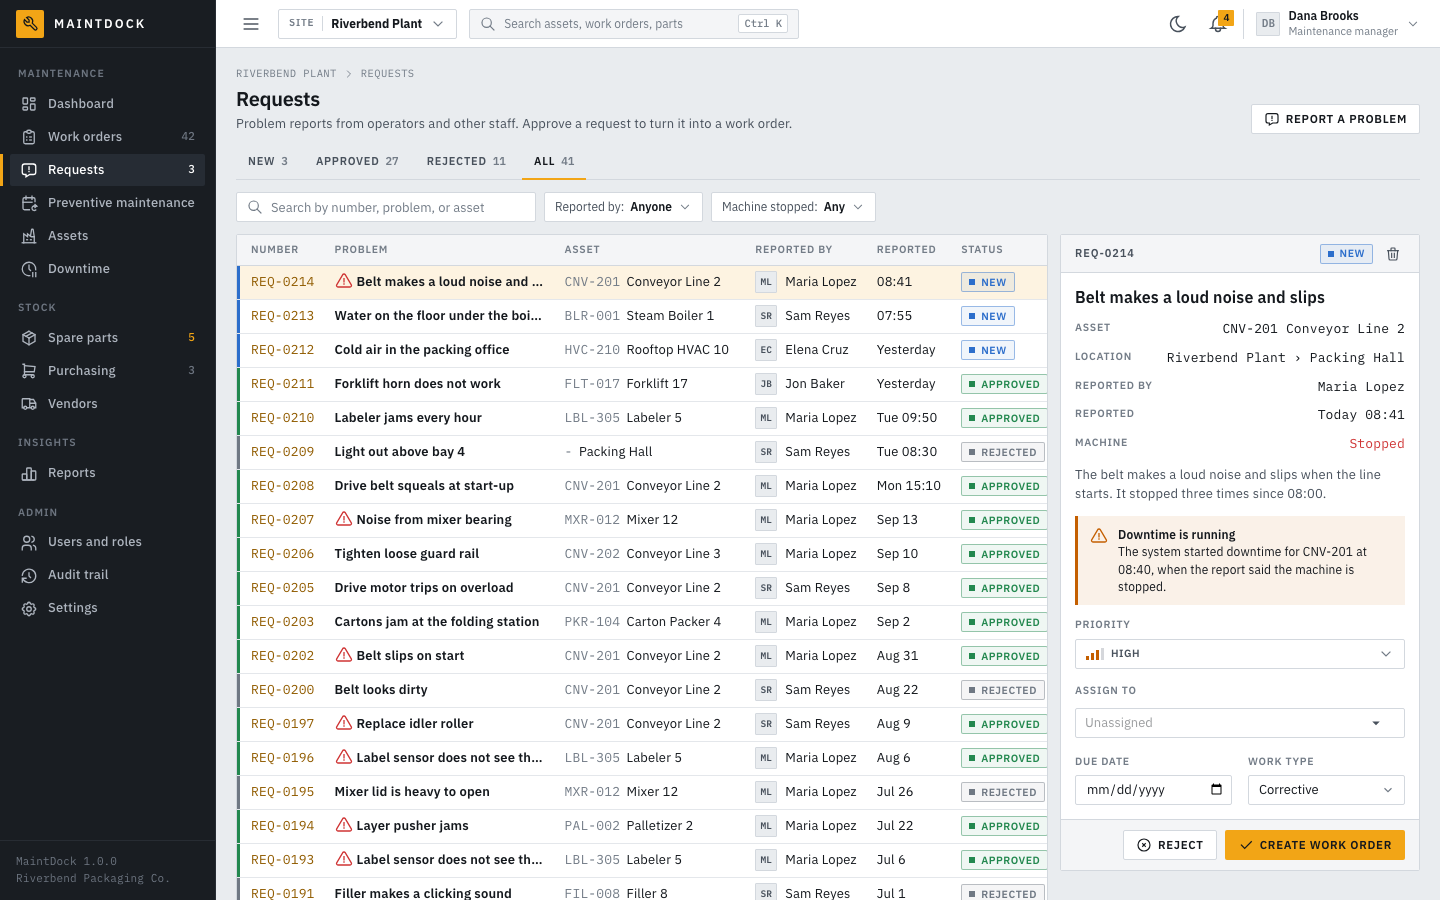
Report a problem
Click Report a problem on the Requests page. On a phone, use the Report tab of the phone view. Fill in:
- The asset. If the problem is not on a machine (for example a light or a door), tick The problem is not on a machine and pick the area instead.
- What is wrong? and, if you want, more Details.
- Is the machine stopped? Yes, stopped, or No, it runs. This question does not show when you tick that the problem is not on a machine.
- Photos, if you have them (up to 6, or up to 5 in the phone view). They help the technician find the problem.
Click Send report. The people who can approve requests at that site get an in-app notification, and an email when email is set up.
Automatic downtime
When the report says the machine is stopped, MaintDock starts downtime for the asset at once. The asset shows as Down. This happens when the setting Start downtime when a request says the machine is stopped is on (it is on by default). The downtime moves to the work order when the request is approved, and it ends when the work order is completed or canceled. If the request is rejected, the downtime stops.
Approve or reject
The tabs are New, Approved, Rejected, and All. Search by number, problem, or asset, and filter by Reported by and Machine stopped. Click a request to see it in the panel on the right. The panel shows the details, the photos, and the running downtime.
- Approve: pick the priority, the person to assign, the due date, and the work type. Then click Create work order. The work order gets the title and the description of the request. The reporter gets a message with the work order number.
- Reject: click Reject and say why. The reporter sees the reason.
Approving and rejecting needs the permission Requests: Edit. Users see the requests of all their sites, not only their own. To delete a request, use the delete button in the panel. It needs Requests: Delete. A request that has a work order cannot be deleted.
Preventive maintenance
Preventive maintenance is planned work that stops failures before they happen, for example greasing bearings every 2 weeks. You add a schedule once, and MaintDock creates the work orders when they are due.
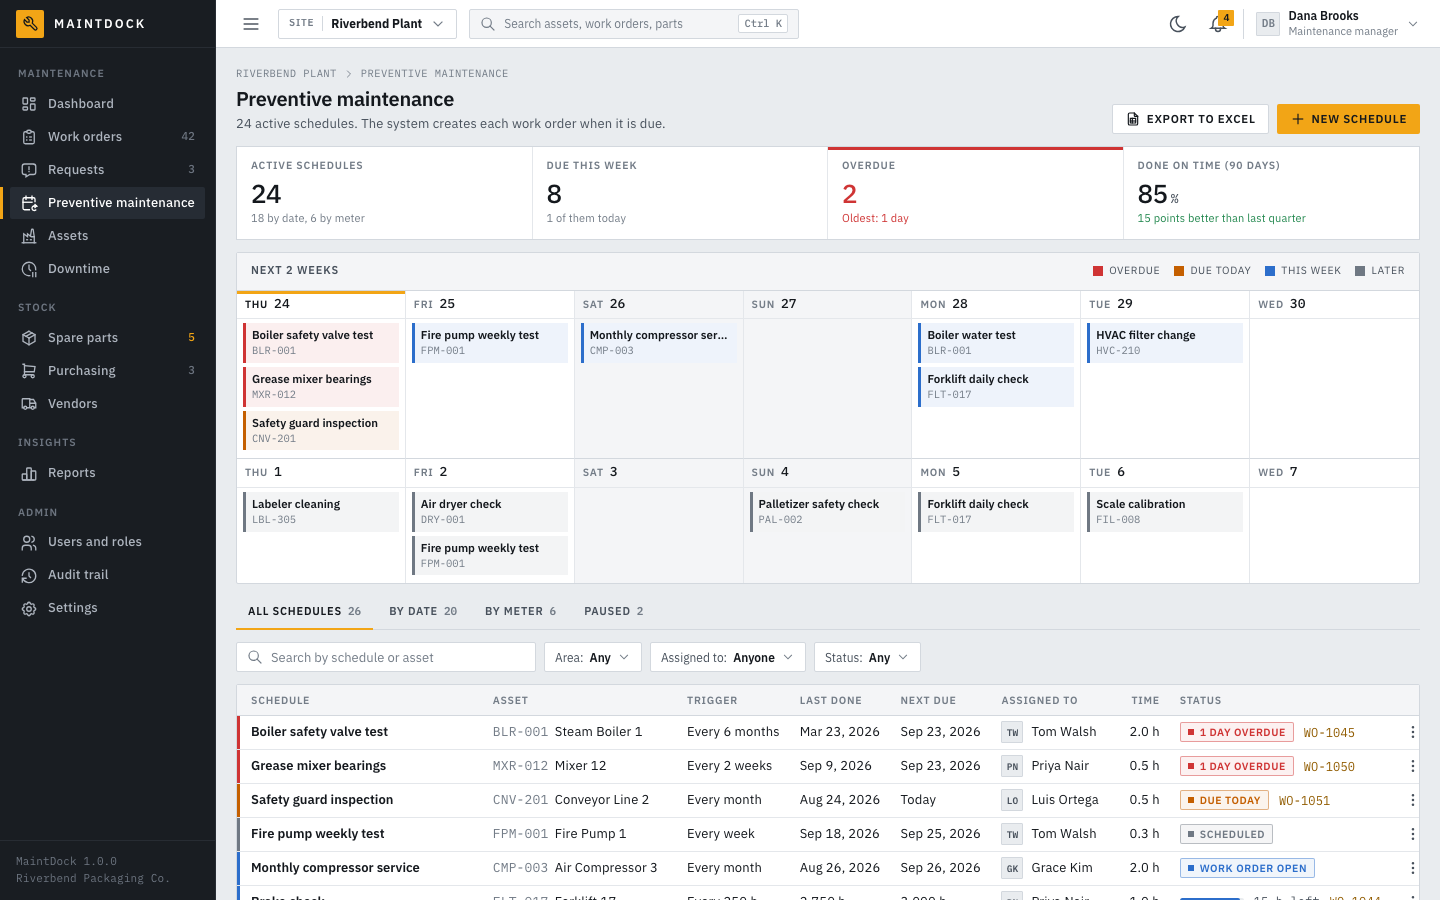
- Key numbers: active schedules, due this week, overdue, and the share of preventive work done on time in the last 90 days.
- Next 2 weeks: a calendar of the work that is due. The colors show overdue, due today, this week, and later. Some entries are next repeats, estimated from the interval.
- Schedules: tabs All schedules, By date, By meter, and Paused. Search by schedule or asset, and filter by Area, Assigned to, and Status. For a meter schedule, a bar shows how many units are left. Click the name of a schedule to open it.
- The actions of a schedule are Edit, Create work order now, Open (the open work order), Pause or Resume, View work orders, and Delete. A schedule that already created work orders cannot be deleted. MaintDock offers to pause it instead.
- Export to Excel exports the schedules that match the tab and the filters.
Add a schedule
Click New schedule (or Add schedule on an asset page). Fill in the form and click Create schedule. The dialog tells you when the system will create the first work order.
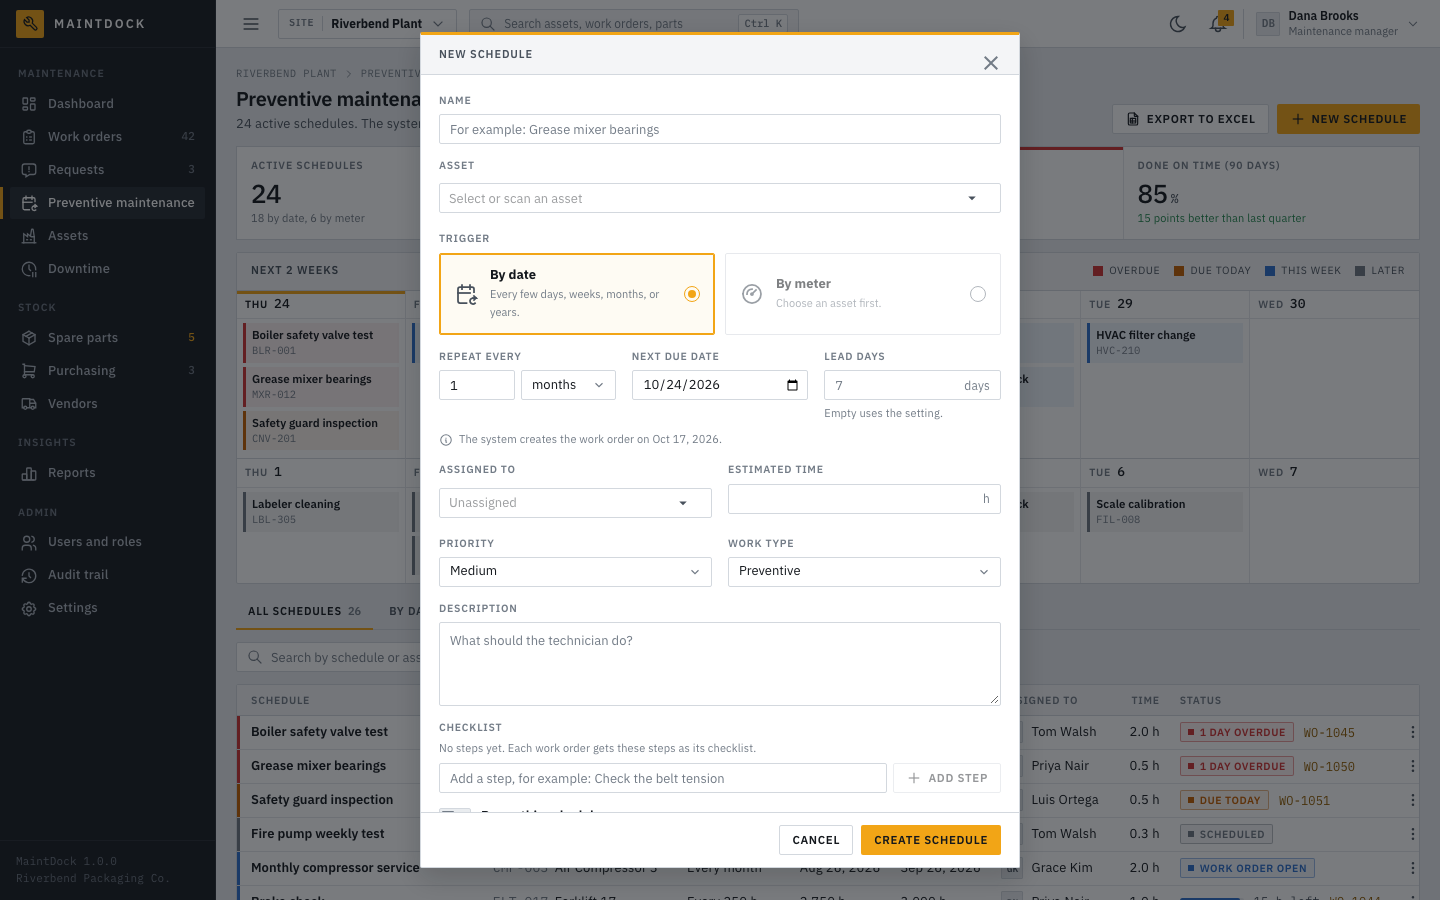
- Name and Asset.
- Trigger:
- By date: repeat every few days, weeks, months, or years. Enter the next due date. Lead days say how many days before the due date the work order is created. Leave it empty to use the setting.
- By meter: repeat every set amount of the asset's meter, for example every 250 run hours. Enter the next due reading. The asset must have a meter.
- Assigned to, Estimated time, Priority, Work type, and a Description.
- Checklist: the steps of the job. Each work order gets them as its checklist.
- Pause this schedule: a paused schedule keeps its history but creates no work orders.
How MaintDock creates the work orders
- A background task checks all schedules every 15 minutes. A new meter reading also checks the schedules of that asset at once. When you save or resume a schedule that is already due, MaintDock creates its work order at once. Paused schedules, and schedules of archived assets, create no work orders.
- By date: the work order is created when today is on or after the due date minus the lead days. The lead days come from the schedule, or from Settings > General > Create preventive work orders (7 days before the due date by default). The lead time is never longer than one interval minus one day (a month counts as 28 days), so a daily schedule creates its work order on the due day. The work order is due on the schedule's due date.
- By meter: the work order is created when the reading is within 5% of the interval before the due reading. For example, with an interval of 250 hours and a due reading of 18,500 hours, it is created at 18,487.5 hours. The work order is due 3 days after it is created.
- A schedule has only one open work order at a time. The next one comes after the open one is done.
- When the work order is completed, the next due date counts from the completion date, so late work does not bunch up. For a meter schedule, the next due reading counts from the reading at completion.
- If someone cancels the work order of a due date, MaintDock does not create it again for that due date.
- Create work order now (in the actions of a schedule) creates the work order at once, even when it is not due yet.
Assets
An asset is anything you maintain: a machine, a vehicle, a building system, or a part of a machine. Open Assets.
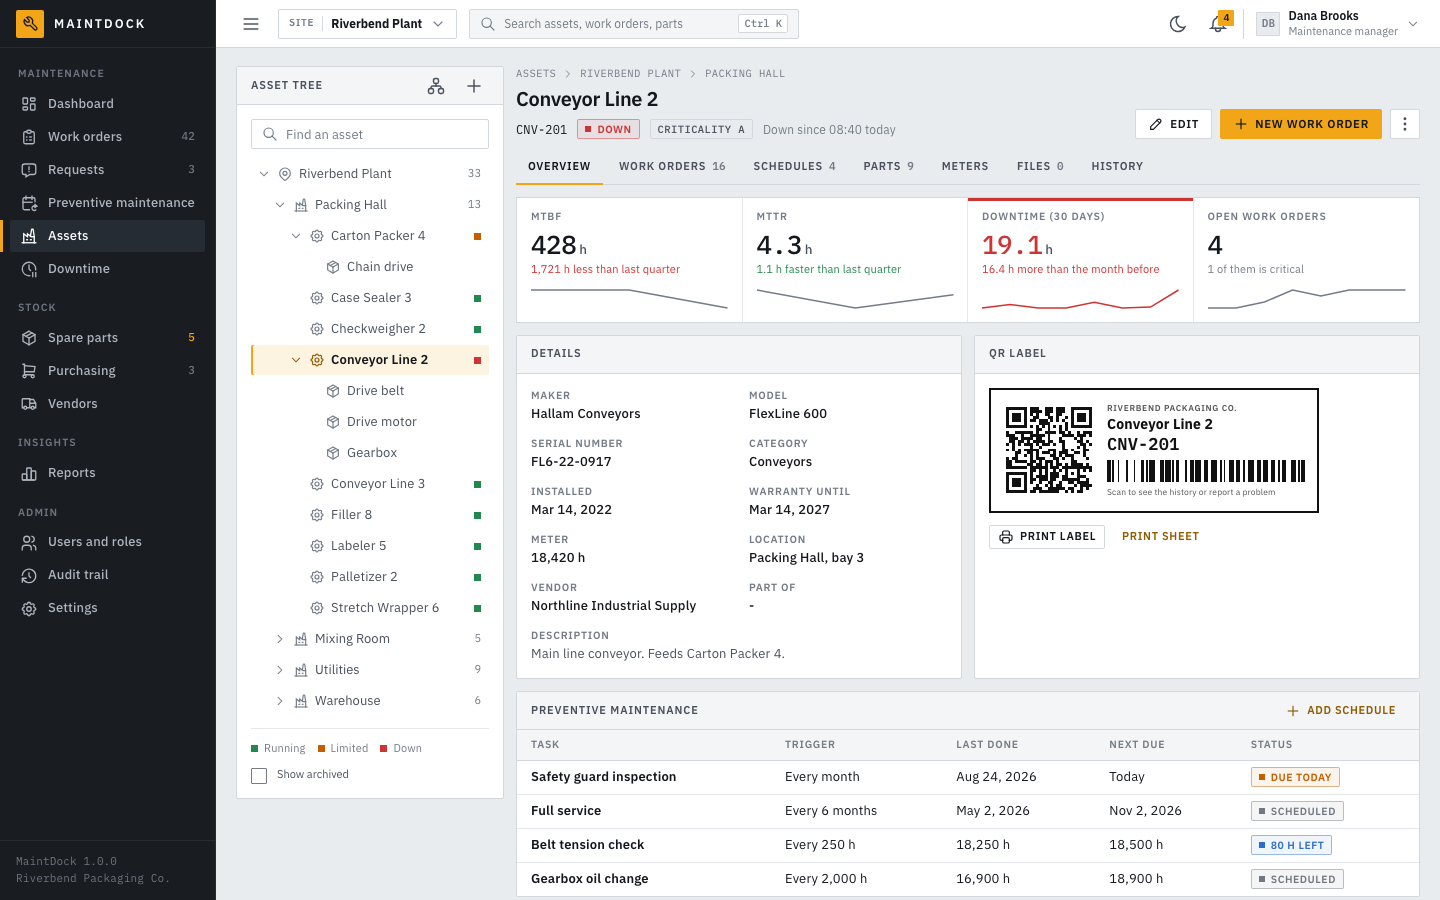
The hierarchy
Assets are ordered in four levels: site > area > machine > part. For example: Riverbend Plant > Packing Hall > Conveyor Line 2 > Drive motor. The asset tree on the left shows this order. A dot shows the status of each machine: Running, Limited, or Down. Use Find an asset to search the tree, and tick Show archived to see archived assets.
- Add area (the first button at the top of the tree) adds a hall, room, or zone to a site. The pencil next to an area renames it. An area can be deleted only when it has no assets and no work orders or requests use it.
- Add asset (the plus button) adds a machine. Fill in the code (it is printed on the label and must be unique, for example
CNV-201), the name, the site, the area, the category, the status (Running or Limited), and the criticality (A high, B medium, C low). You can also add the maker, model, serial number, location, install date, warranty date, vendor, and a description. The status Down is set by downtime, not by hand. - To add a part of a machine, pick the machine in Part of.
- Tick This asset has a run time meter if you want to plan work by run hours, and enter the current reading.
The asset page
The top shows the code, the status, and the criticality. The buttons are Edit, New work order, and More actions (Log downtime, Stop downtime now, Add a part of this asset, Archive, and Delete). The key numbers are MTBF and MTTR of the last 90 days, downtime in the last 30 days, and open work orders. The tabs are:
- Overview: the details, the QR label, the preventive schedules, and the recent work orders.
- Work orders: all work orders of this asset and its parts.
- Schedules: the preventive schedules of the asset.
- Parts: the spare parts that fit this asset (its bill of materials), with the stock on hand at the site. Technicians find the right part fast.
- Meters: the run time meter and its readings.
- Files: manuals, drawings, and photos.
- History: the activity and the changes to the record.
The work orders, the schedules, and the parts show only to users whose role can see work orders, preventive maintenance, and spare parts. For example, a Requester sees the asset details, meters, and files, but not the work orders.
Archive hides an asset and its parts from the pickers and from the tree, but keeps their history. You cannot archive an asset that is down. Stop its downtime first. Use Restore in More actions to show it again. Delete works only for an asset without history: no work orders, requests, downtime, schedules, meter readings, or assets under it. For any other asset, MaintDock tells you to archive it. Delete removes the asset with its parts list and files, and cannot be undone.
Meters
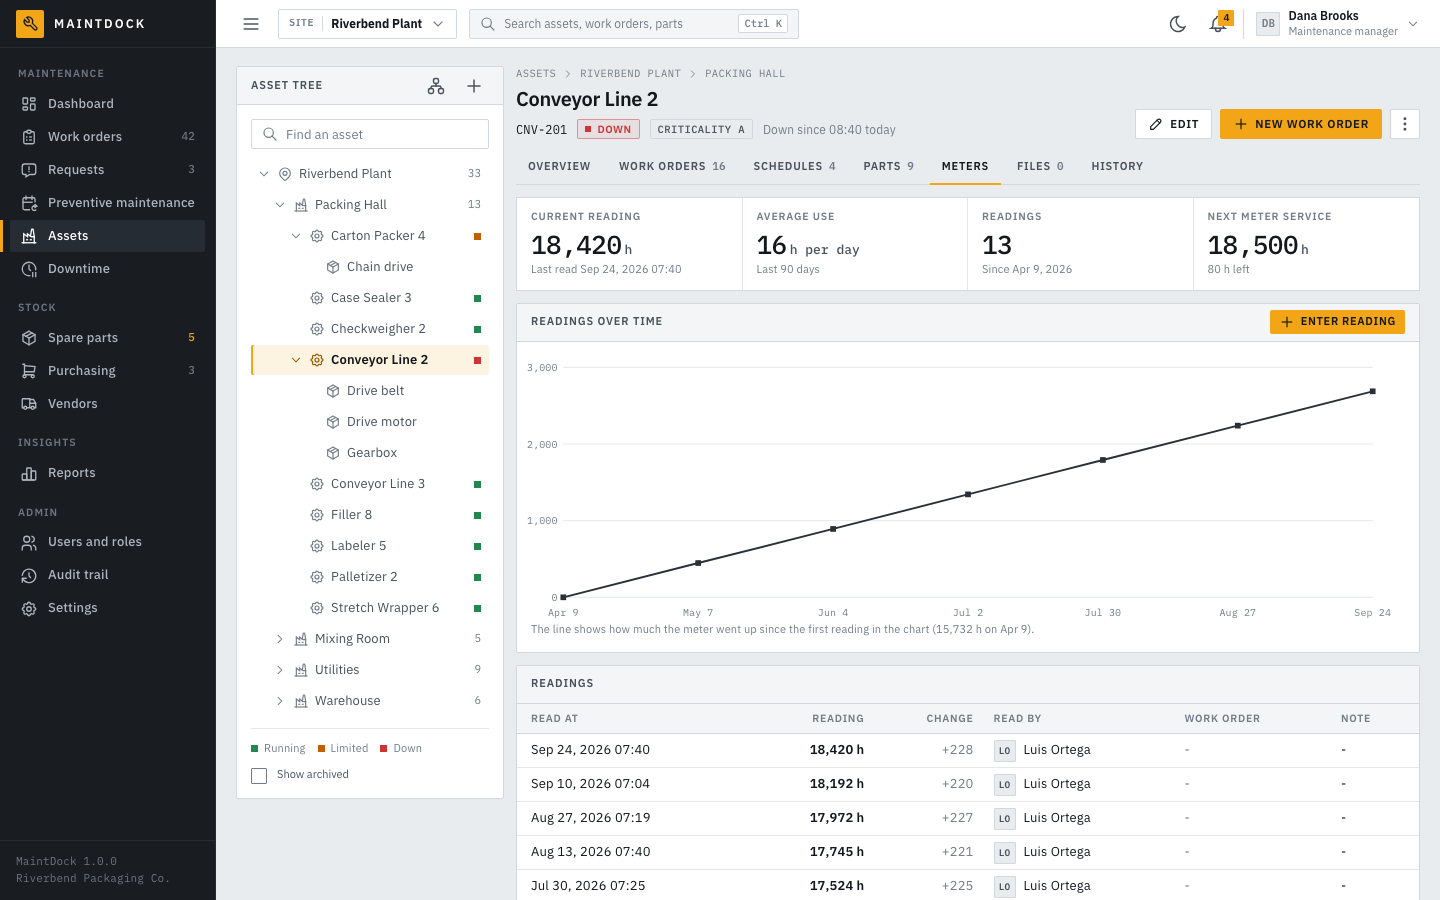
A meter counts run time, for example hours or kilometers. The unit is set in Settings > Currency and units (hours by default). When an asset has no meter yet, click Turn on the meter on the Meters tab. Click Enter reading to add a reading, with an optional note. A new reading cannot be lower than the last one. Entering readings needs Assets: Edit or Work orders: Edit. You can also enter a reading when you complete a work order, and on a phone after you scan the asset. The Meters tab shows the current reading, the average use per day in the last 90 days, the number of readings, the next meter service, a chart, and the list of readings.
QR and barcode labels
Each asset has a label with a QR code, the asset name, and the code. It can also show the company name, a Code 128 barcode for barcode scanners, and a short hint such as Scan to see the history or report a problem.
- Print label (on the Overview tab) opens a PDF with the label of one asset, on a page of the label size. This is for label printers.
- Print sheet opens a PDF with many labels on A4 sheets: all assets of the area, or the assets you pick. You can add cut marks.
- The size is 70 × 36 mm by default. Change the size and the content in Settings > Asset labels.
The QR code holds a link such as https://maint.yourcompany.com/a/CNV-201. When someone scans it with a phone camera, MaintDock opens the asset (after sign-in). When no public web address is set, the label uses the address that you used to open MaintDock when you printed it. So set the public web address before you print labels.
Downtime
Downtime is the time when an asset does not run. MaintDock uses it to calculate MTBF, MTTR, and availability. Open Downtime.
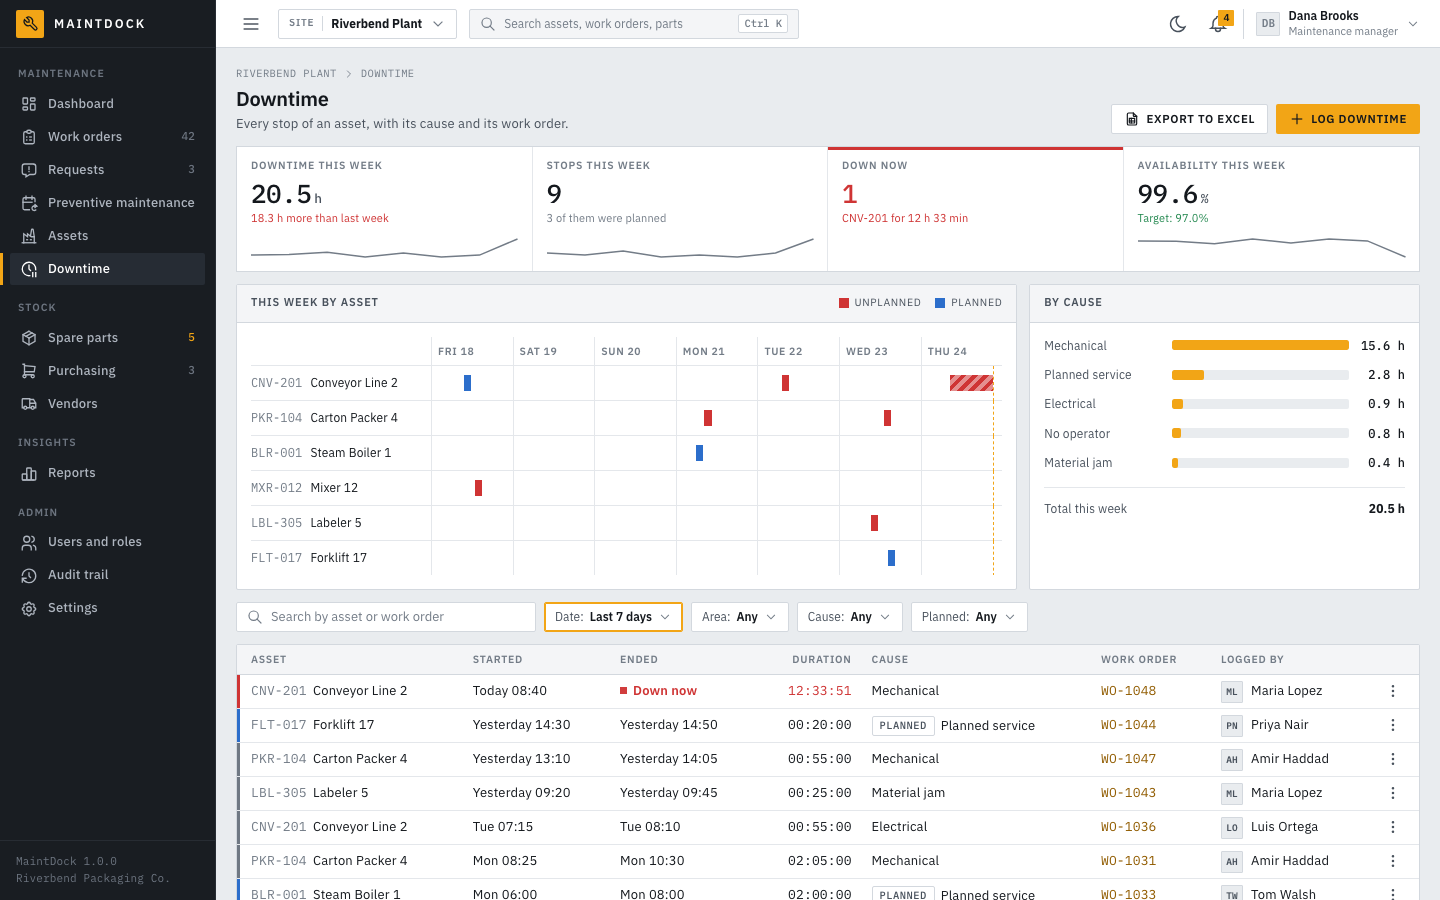
- Key numbers: downtime this week, stops this week, assets down now, and availability this week with your target.
- This week by asset: a timeline of the last 7 days. Red bars are unplanned stops, and blue bars are planned stops.
- By cause: hours per cause.
- The list: every stop with the asset, start, end, duration, cause, work order, and who logged it. Search by asset or work order. Filters: Date (Last 7 days by default), Area, Cause, and Planned. The actions of a stop are Stop now (while it runs), Edit, and Delete.
- Export to Excel exports the stops in the list.
Start and stop downtime
Downtime starts in one of these ways:
- Log downtime on the Downtime page or in More actions on an asset page. Enter the asset, the start, the end (or tick Still down), the cause, the work order, Planned downtime, and a note. You can also log a stop that already ended.
- Start downtime for this asset now in the New work order dialog, or Start downtime on a work order.
- A request that says the machine is stopped.
While downtime runs, the asset's status is Down. Downtime ends when you click Stop downtime, Stop downtime now, or Stop now, or when its work order is completed or canceled. The asset goes back to Running when it has no other running downtime. Logging downtime needs Downtime: Create, and stopping or editing it needs Downtime: Edit.
Causes, planned and unplanned
- Each stop can have a cause. The default causes are Mechanical, Electrical, Planned service, No operator, Material jam, and Other. Change them in Settings > General > Downtime causes.
- A stop is planned (for example a planned service) or unplanned (a failure). A planned cause makes the stop planned by default, and you can tick Planned downtime by hand.
- Only unplanned stops count as failures in MTBF and MTTR. Both planned and unplanned stops lower the availability.
Deleting a stop changes MTBF and MTTR, and cannot be undone.
Spare parts and stock
Open Spare parts. The parts catalog is shared by all sites. The stock is kept per store, and each store belongs to one site.
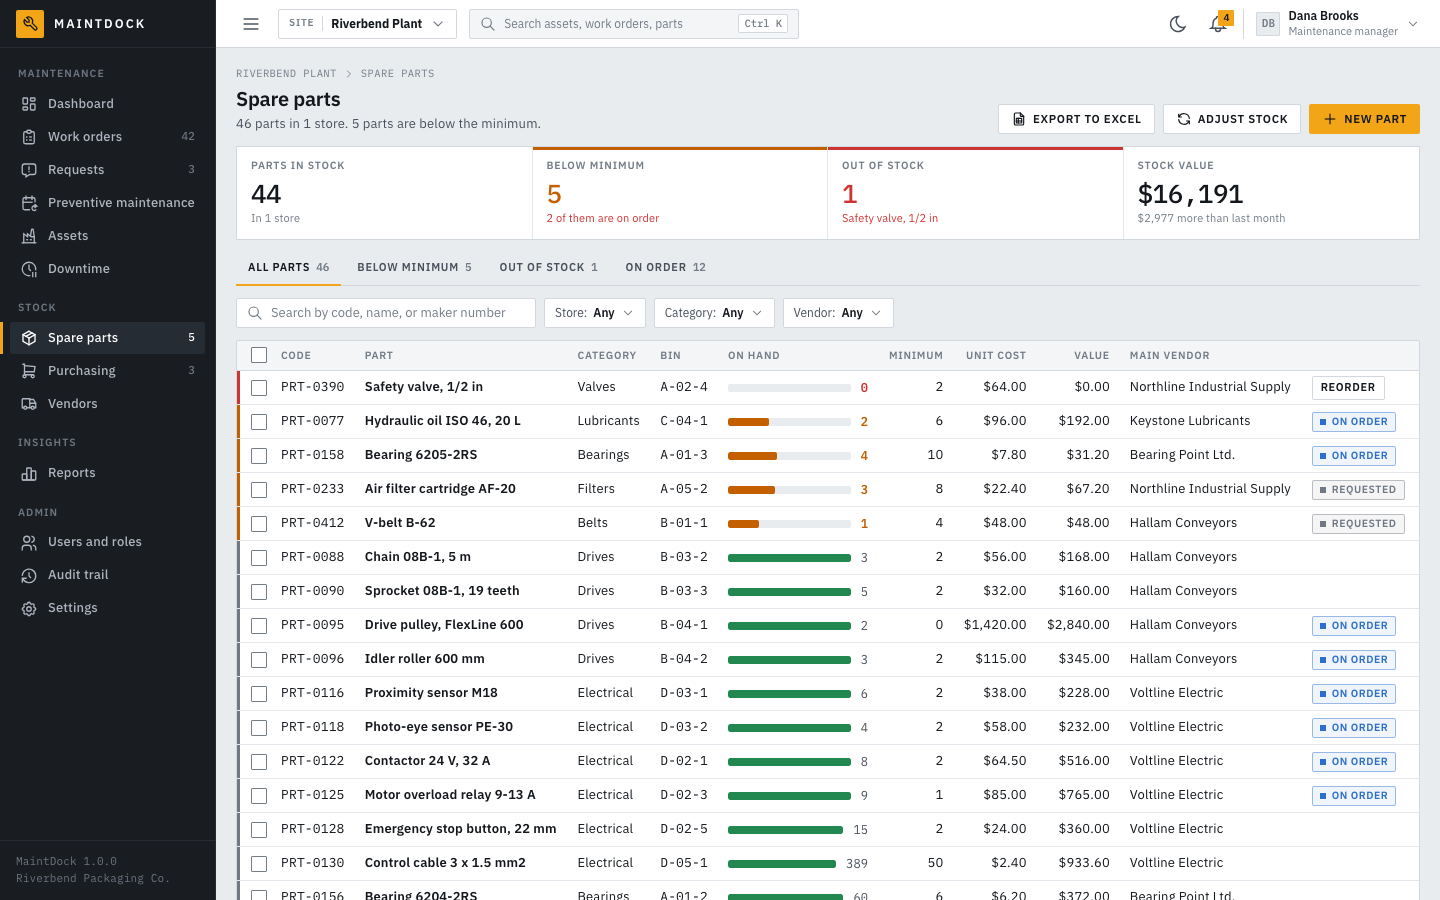
- Key numbers: parts in stock, parts below the minimum, parts out of stock, and the stock value.
- Tabs: All parts, Below minimum, Out of stock, and On order. An Archived tab shows when there are archived parts. Search by code, name, or maker number. Filters: Store, Category, and Vendor.
- A part below its minimum has a Reorder button. Select rows with the check boxes and click Request parts to ask for many parts at once.
- New part: the name, the code (suggested from the numbering), the maker part number, the category, the unit, the unit cost, the main vendor, and a description. You can also pick the first store with the bin, the minimum, and the reorder quantity. People with Stock adjustments: Create can also enter a starting quantity. It is saved as an adjustment with the reason Starting quantity, so it shows in the stock movements.
- Export to Excel makes a file with two sheets: the parts, and the stock by store.
The part page
Click a part to see its stock by store, its stock movements, its open purchase orders, the assets that use it, and its files. Here you can edit the bin (shelf place), the minimum, and the reorder quantity for each store, and add the part to another store (Add to a store).
Parts are not deleted, because their stock history must stay. Archive on the part page hides a part from the list and the pickers. It needs Spare parts: Delete. Restore shows it again.
Stock movements
| Movement | What it does | Where you do it |
|---|---|---|
| Issue | Takes parts out of a store for a work order. | Add part on a work order, or Part in the phone view. |
| Return | Puts issued parts back into the store. | Return to stock on a work order. |
| Receive | Adds delivered parts to a store and updates the average cost. | Receive items on a purchase order. |
| Adjust | Sets the counted quantity, with a reason (for example a stock count, or a damaged part). | Adjust stock on the Spare parts page or the part page. It needs Stock adjustments: Create. |
Every movement is saved with the date, the person, and the balance after the movement.
Minimum stock and low-stock alerts
When the stock of a part in a store falls below its minimum, MaintDock sends a low-stock notification to the people who manage spare parts at that site (people with Spare parts: Edit). A minimum of zero turns the alert off. The part shows in the Low stock card of the dashboard. Click Reorder or Request parts to start a purchase request. The reorder quantity is the suggested quantity.
Average cost
Each part has one average unit cost for all stores. When you receive parts, MaintDock updates it like this (the stock on hand is the stock in all stores):
new average = (stock on hand × old average + received quantity × received unit cost) / (stock on hand + received quantity)
Example: you have 10 pieces at $5.00. You receive 10 more at $7.00. The new average is (10 × 5.00 + 10 × 7.00) / 20 = $6.00. Issued parts are charged at the average cost of the moment when they are issued.
Purchasing
Purchasing follows four steps: purchase request → approval → purchase order → receiving. Receiving adds the parts to stock. Open Purchasing.
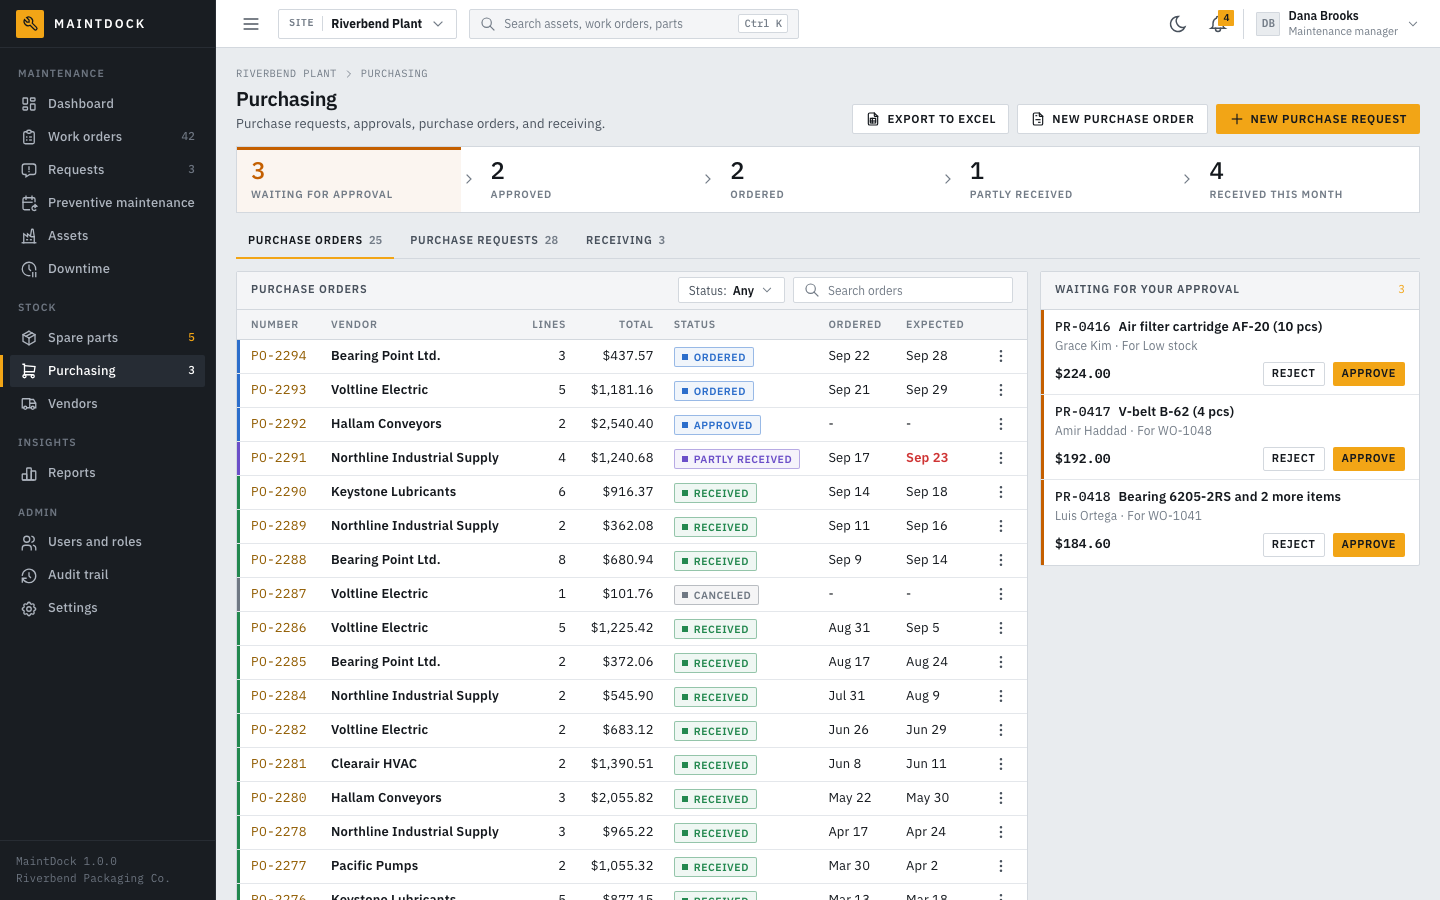
The counters at the top show how many items wait for approval, are approved, are ordered, are partly received, and were received this month. The tabs are Purchase orders, Purchase requests, and Receiving (the orders that still wait for delivery). Each tab has a search box, and the first two tabs also have a Status filter. Export to Excel exports the orders or the requests of the open tab.
1. Purchase request
Anyone with Purchase requests: Create can ask for parts. Click New purchase request, add the lines (a catalog part, or another item with a text), the quantity, and the estimated unit cost. Add the work order that needs the parts, or a reason such as Low stock. You can suggest a vendor and add notes. Click Send for approval. You can cancel your own request (Cancel request on the request page) until it is on a purchase order.
2. Approval
People with Purchase requests: Approve see the request in Waiting for your approval, and on the request page. Click Approve, or Reject with a reason. The requester sees the decision.
3. Purchase order
Click New purchase order (or Create purchase order on an approved request). Build it from approved requests (an order has one vendor and one site, so pick the lines of one vendor), or start an empty order. Set the vendor, the site, the store that receives the parts (Receive into), the tax rate, the shipping cost, and notes for the vendor. Click Create order. You can change the order and its lines with Edit lines until you mark it as ordered.
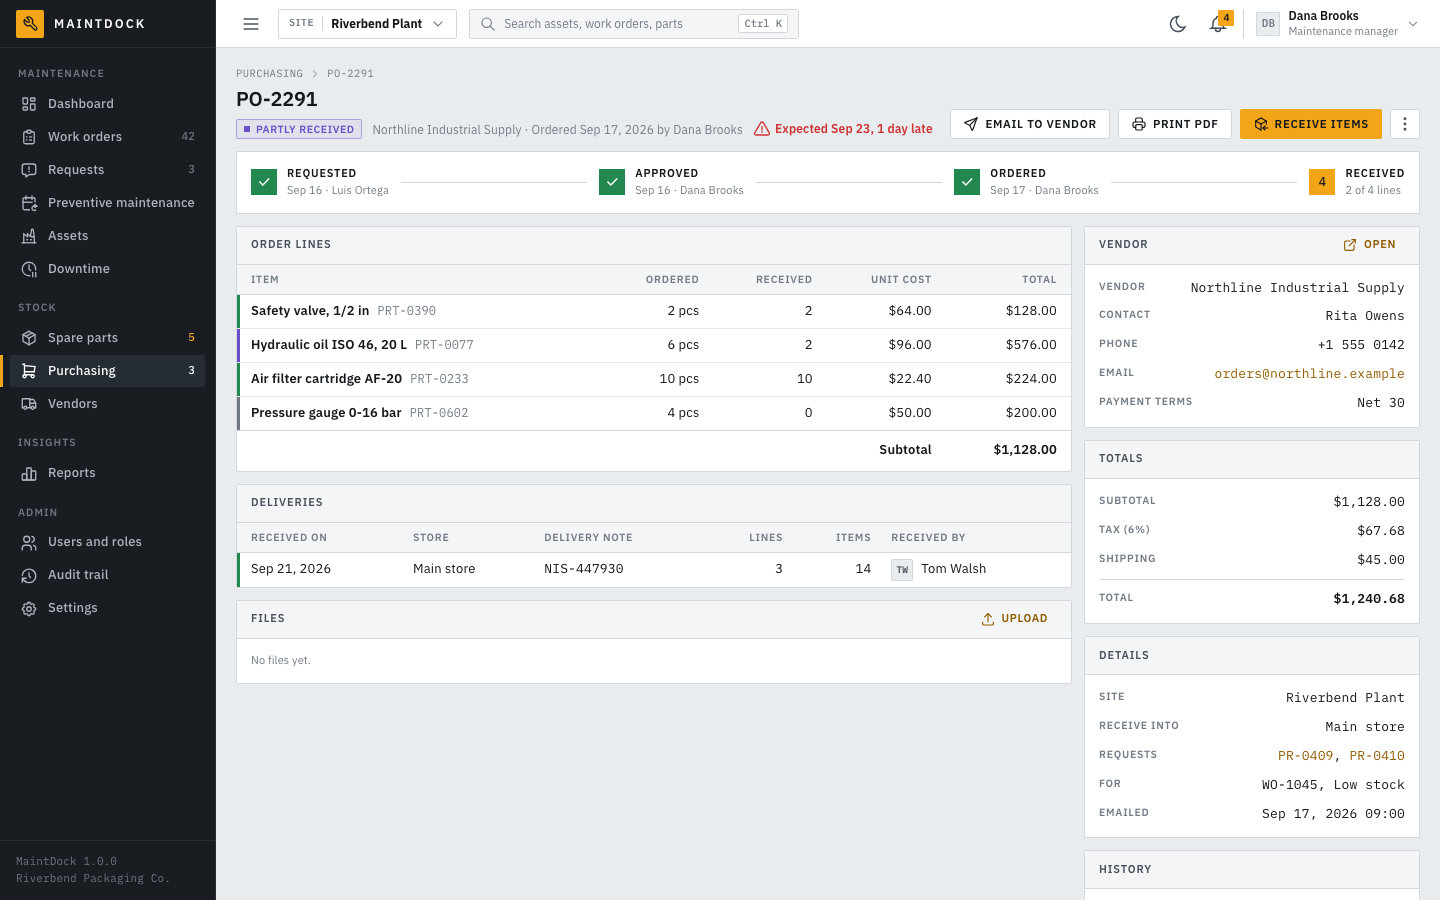
- Email to vendor sends the order to the vendor's email address, with the lines, the totals, and where to deliver. It needs email to be set up, and an email address on the vendor. Print PDF makes a PDF of the order.
- Click Mark as ordered after you send the order to the vendor. You can enter the expected date. After that date, the order shows as late. Change expected date is in the More actions menu.
- An order that has nothing received yet can be canceled (Cancel order in More actions). Its requests go back to Approved, so they can go on a new order.
- The page also shows the deliveries, the files of the order (for example the vendor's confirmation), and the history.
4. Receiving
When the parts arrive, click Receive items (or Receive on the Receiving tab). For each line, enter the quantity you received now. Pick the store (Receive into, a store at the site of the order), and enter the delivery note number and the date. The date cannot be in the future. Then click the receive button (for example Receive 8 items). MaintDock adds the parts to the stock and updates the average unit cost. The order becomes Partly received or Received. You can receive in more than one delivery. Receiving needs the permission Receiving: Create.
The statuses are: purchase requests Waiting for approval, Approved, Rejected, Ordered, Canceled; purchase orders Approved, Ordered, Partly received, Received, Canceled.
Vendors
Vendors are the companies you buy parts and services from. They are shared by all sites. Open Vendors.
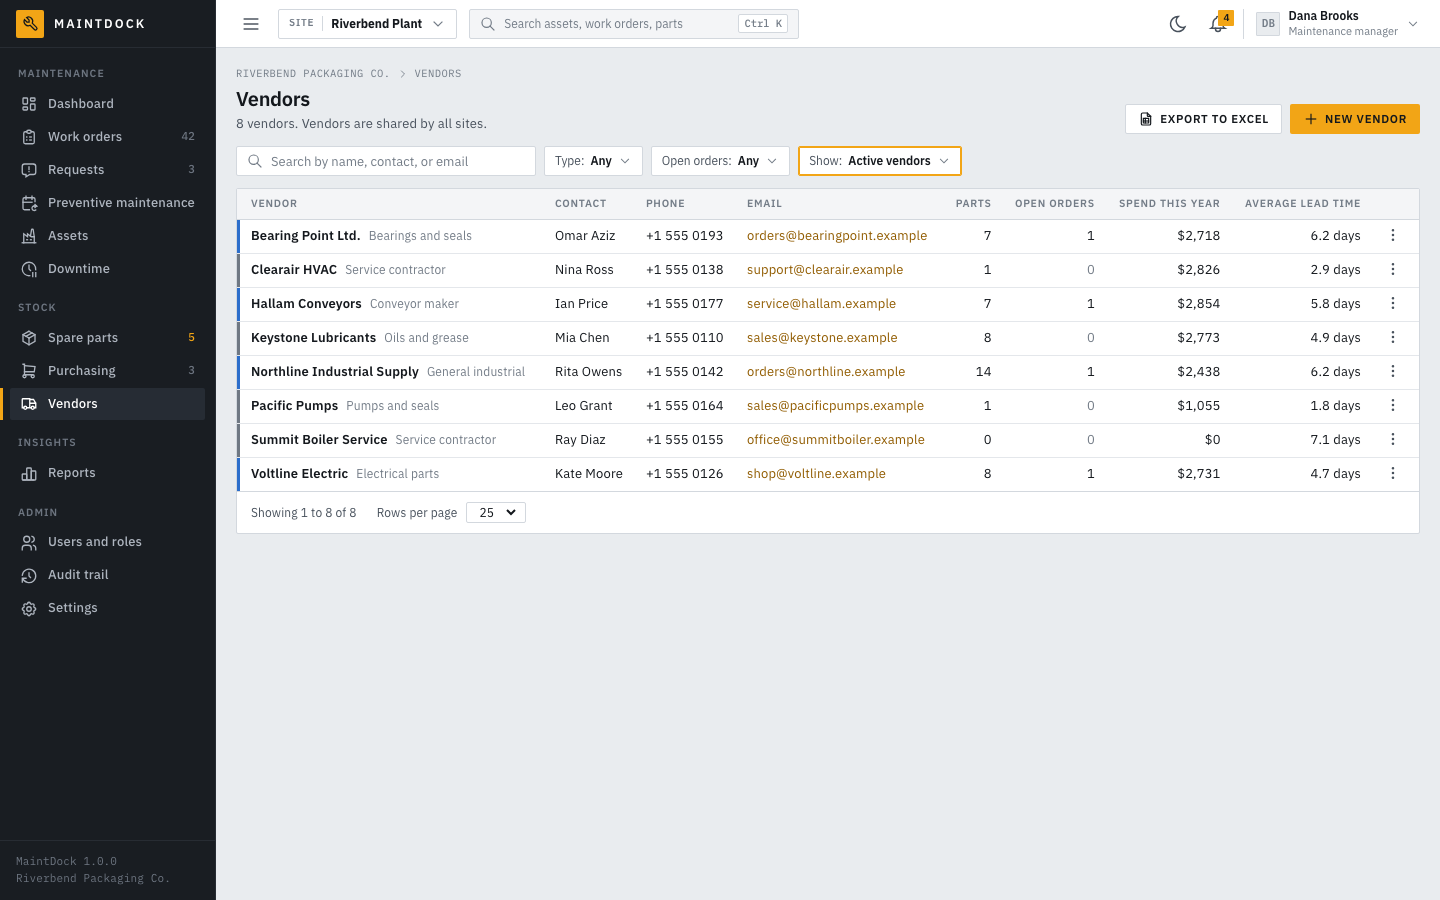
- The list shows the contact, phone, email, the number of parts with this main vendor, open orders, the spend this year, and the average lead time (the average days from ordering to full receipt). Search by name, contact, or email. Filters: Type, Open orders, and Show (active vendors by default, archived vendors, or all).
- New vendor: the name, type (what the vendor sells), payment terms (for example Net 30), contact, phone, email (purchase orders are sent to this address), website, address, and notes.
- The vendor page shows the spend by month for the last 12 months, the purchase orders, the parts supplied, and the files of the vendor. New purchase order there starts an order for this vendor.
- Delete or archive on the vendor page deletes a vendor that is not used. A vendor with orders, requests, parts, or assets cannot be deleted, so MaintDock offers to archive it instead. An archived vendor is hidden from the pickers, and its orders stay. Restore makes it active again.
Reports
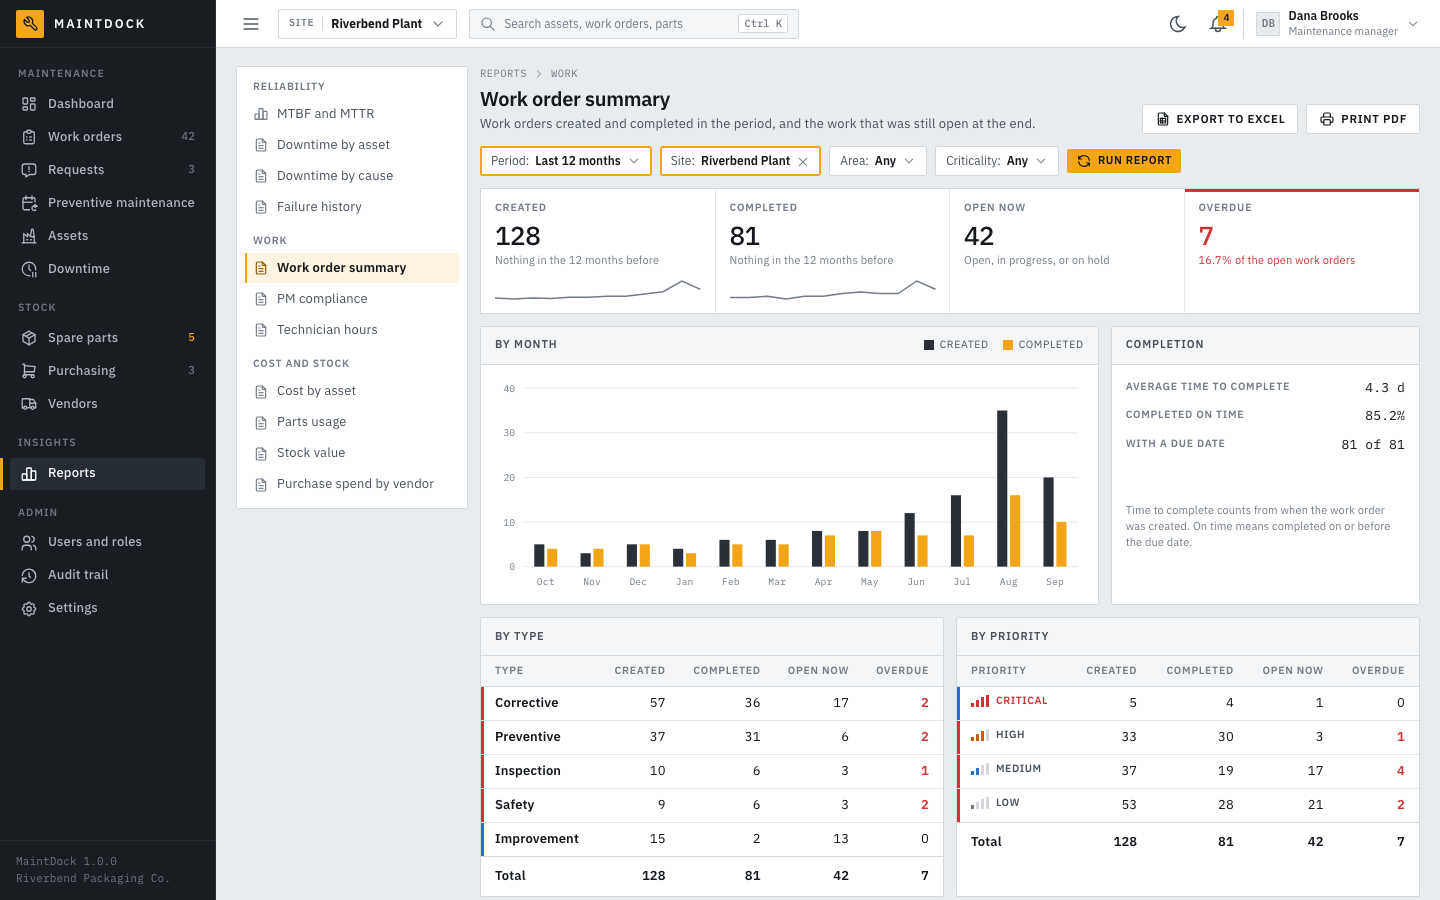
Open Reports. Pick a report on the left, set the filters (Period, Site, Area, and Criticality), and click Run report. The periods are Last 30 days, Last 90 days, Last 12 months, This year, Last year, and Custom (with a From and a To date). Stock value has no period filter, and Stock value and Purchase spend by vendor have no Area and Criticality filters. Every report can be printed as PDF (Print PDF), and exported to Excel by people with the permission Export to Excel.
| Group | Report | What it shows |
|---|---|---|
| Reliability | MTBF and MTTR | Mean time between failures and mean time to repair, by month and by asset. Only unplanned downtime counts as a failure. |
| Downtime by asset | Hours each asset was down in the period, planned and unplanned. | |
| Downtime by cause | Hours and stops per downtime cause, and the share of each cause. | |
| Failure history | Every unplanned stop that started in the period, newest first. | |
| Work | Work order summary | Work orders created and completed in the period, and the work that was still open at the end. |
| PM compliance | Preventive work orders due in the period: done on time, done late, or not done. | |
| Technician hours | Hours logged on work orders per person, and the labor cost. | |
| Cost and stock | Cost by asset | Parts and labor cost of work orders per asset. Parts count when they are issued, labor when it is logged. |
| Parts usage | Spare parts issued from stock in the period, minus the parts returned. | |
| Stock value | The value of the spare parts in stock now, at the average unit cost. It has no period filter. | |
| Purchase spend by vendor | Purchase orders placed and goods received per vendor in the period. |
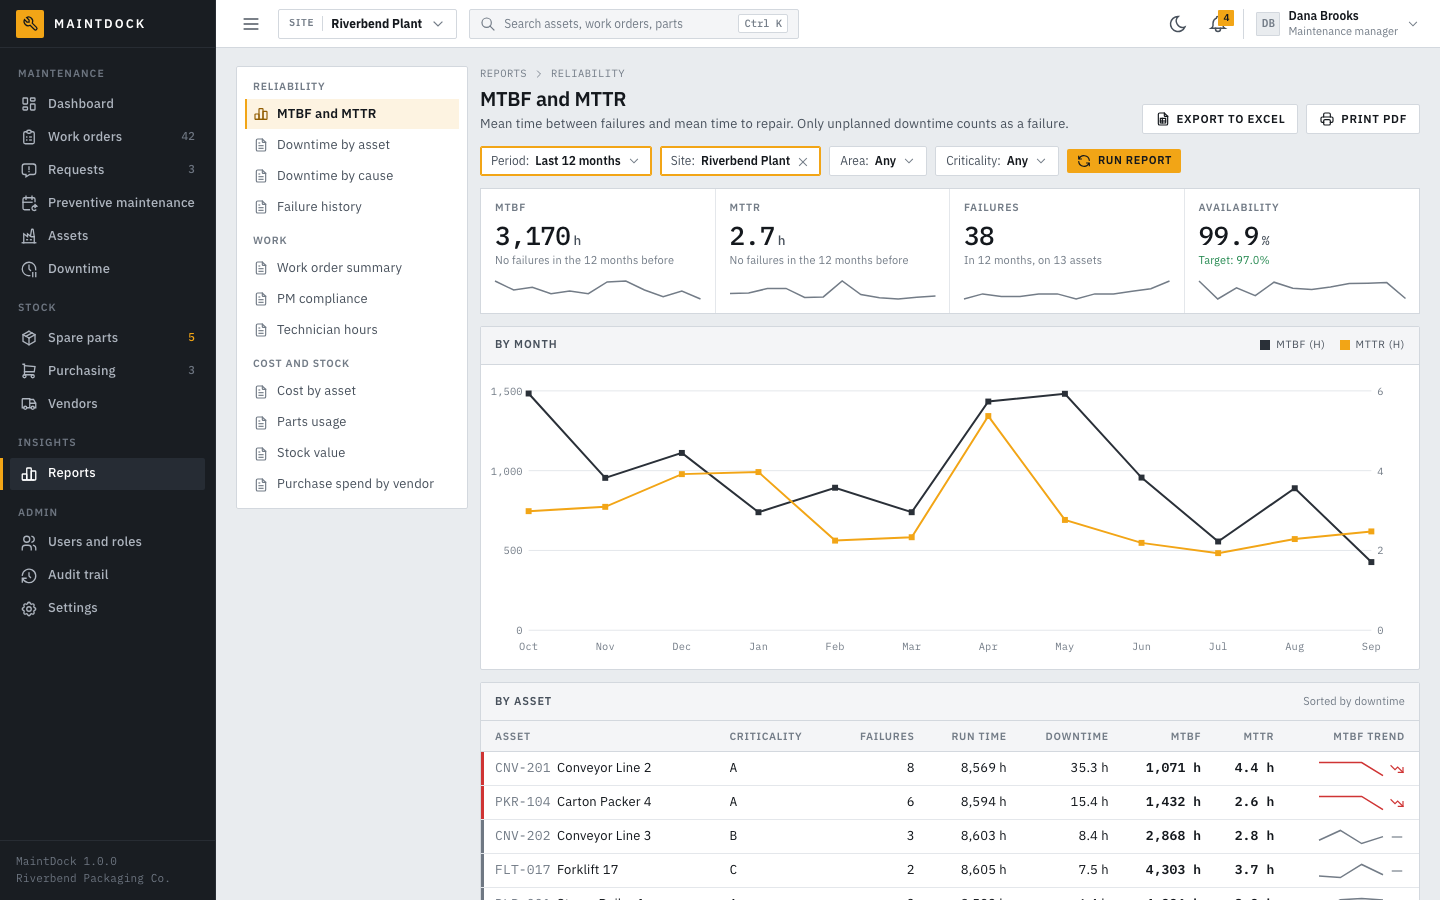
MTBF, MTTR, and availability in plain words
- A failure is one unplanned stop of an asset. Planned stops, such as a planned service, are not failures.
- Run time is the time in the period minus all downtime (planned and unplanned).
- MTBF (mean time between failures) is how long an asset runs, on average, before it fails.
MTBF = run time / number of failures. Higher is better. - MTTR (mean time to repair) is how long a failure lasts, on average.
MTTR = unplanned downtime / number of failures. Lower is better. - Availability is the share of time an asset was not down.
Availability = 1 - (all downtime / time in the period). Higher is better. Your target is set in Settings > Currency and units (97% by default).
Example. In 30 days (720 hours), a conveyor had 3 unplanned stops of 6 hours in total, and 1 planned service of 2 hours. Run time is 720 - 8 = 712 hours. MTBF is 712 / 3 = about 237 hours. MTTR is 6 / 3 = 2 hours. Availability is 1 - 8 / 720 = about 98.9%.
Rules: a stop counts as a failure in the period when it starts in the period. Downtime counts only for the part inside the period, and a stop that is still running counts up to now. When there was no failure, MTBF and MTTR have no value. In the totals, MaintDock adds up the assets that had downtime in the period.
Phone view for technicians
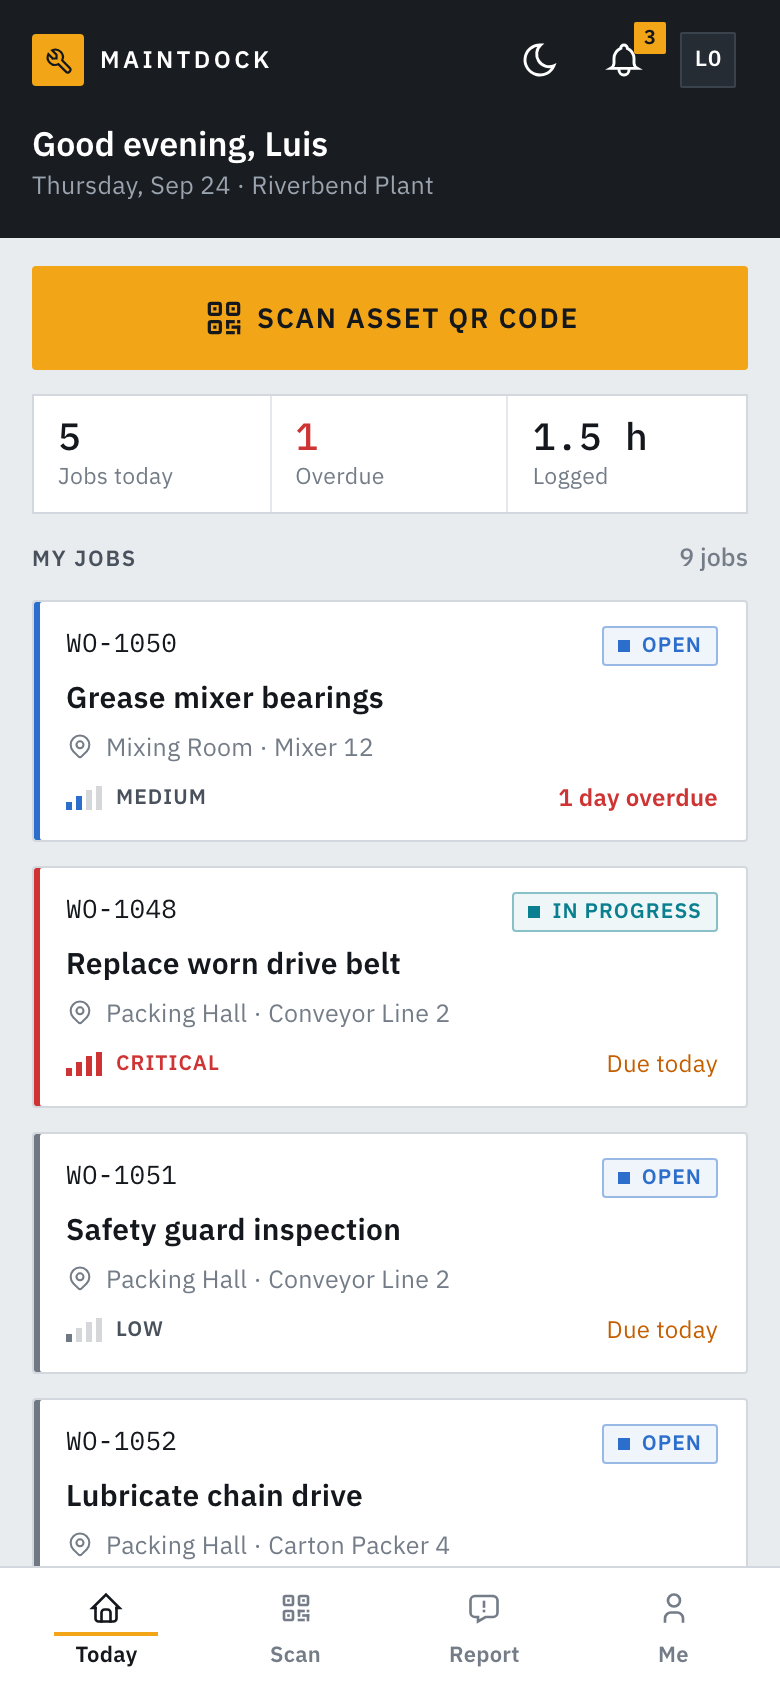
The phone view is a simple version of MaintDock for phones. Technicians see their jobs, run the job timer, tick the checklist, add parts and photos, scan QR labels, and report problems. Open it from the user menu (Phone view), or go to /m on your web address, for example https://maint.yourcompany.com/m. On a phone (a screen narrower than 760 pixels), sign-in opens the phone view. On a larger screen, it opens the desktop view. The app installed on the home screen (see below) always opens the phone view.
Install it on the home screen
The phone view can be installed like an app. Open the Me tab and tap Install on this phone. If your phone does not show the install button:
- iPhone (Safari): tap Share, then Add to Home Screen.
- Android (Chrome): open the browser menu, then tap Install app or Add to Home screen.
The phone view needs a connection (Wi-Fi or mobile data). It does not work offline. Without a connection, it shows a page that says you are offline, with a button to try again.
The four tabs
- Today: a big Scan asset QR code button, a summary (jobs today, overdue, and hours logged today), and My jobs: the open work orders assigned to you. People whose role cannot see work orders (for example requesters) see a big Report a problem button and My reports instead, with the state of each report.
- Scan: scan the QR label on a machine. See below.
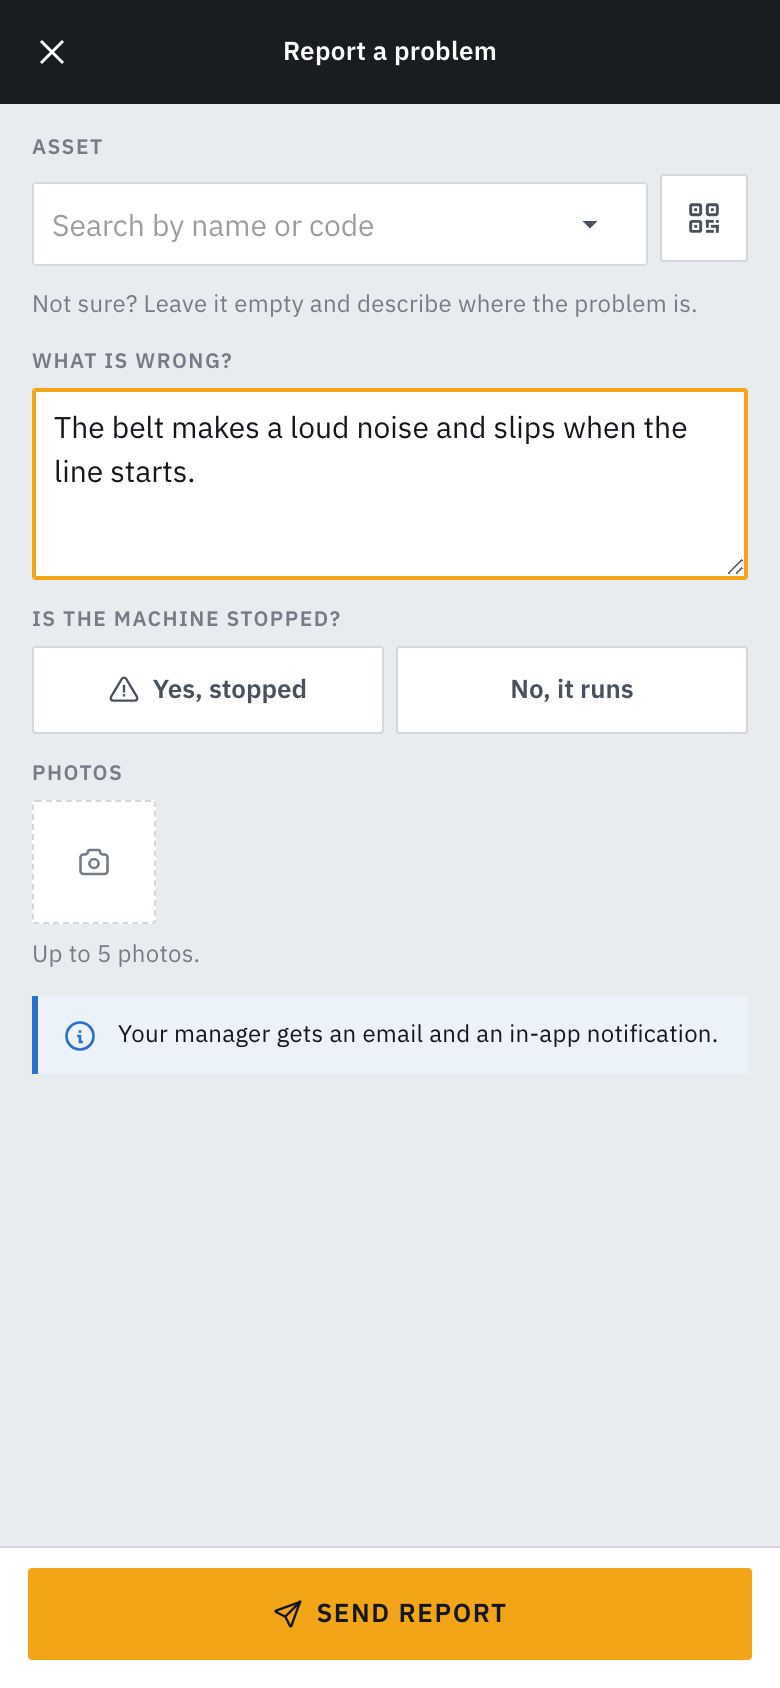
- Report: report a problem. Pick or scan the asset (or leave it empty and say where the problem is), say what is wrong, say whether the machine is stopped, add up to 5 photos, and tap Send report. Your manager gets an in-app notification, and an email when email is set up.
- Me: your site, dark mode, install on this phone, notifications, change password, open the desktop view, and sign out.
You see only the tabs that your role allows. Scan needs Assets: View, and Report needs Requests: Create.
A job and the job timer
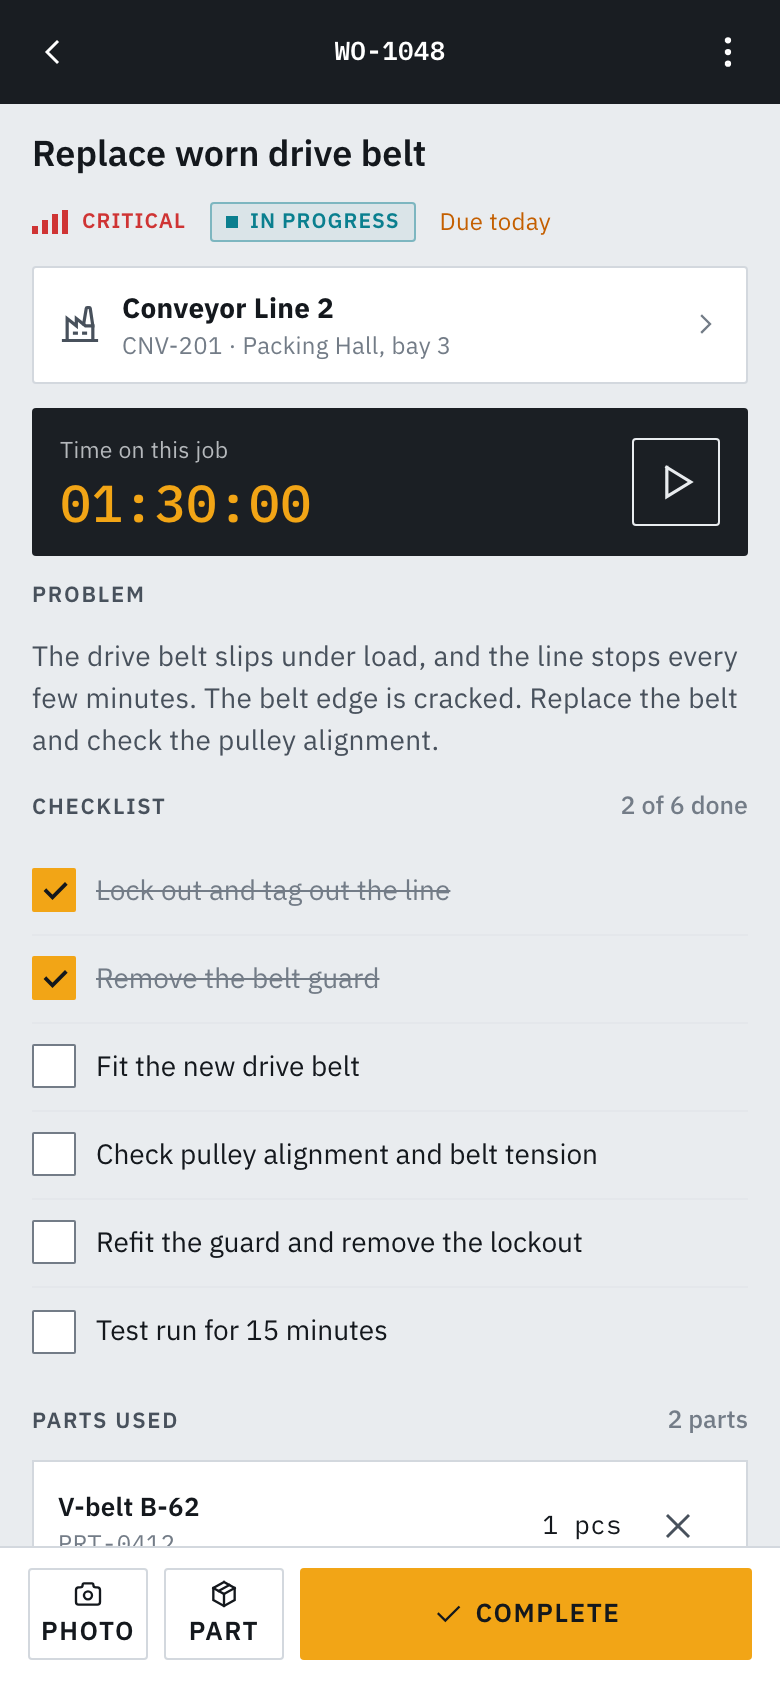
Tap a job to open it. The page shows the asset, the problem, the checklist, the parts used, and the photos. Tap a checklist step to tick it.
- Job timer: tap play to start the timer and pause to stop it. Starting it moves the job to In progress, and it stops your timer on any other job. Your time is logged on the work order when the timer stops.
- Photo adds photos from the camera. Part takes a spare part from a store for this job. The cross next to a part returns it to stock.
- Complete finishes the job. Say what you did, enter a meter reading if the asset has a meter, and tap Complete job. Your timer stops. If the setting Ask for a photo before a work order is completed is on, add a photo first.
- The More menu (at the top right) has Put on hold (stops the work with a reason) or, for a job on hold, Resume work. It also has Asset details and Open in the desktop view. You can also tap play on the timer to start again after a hold.
QR scan
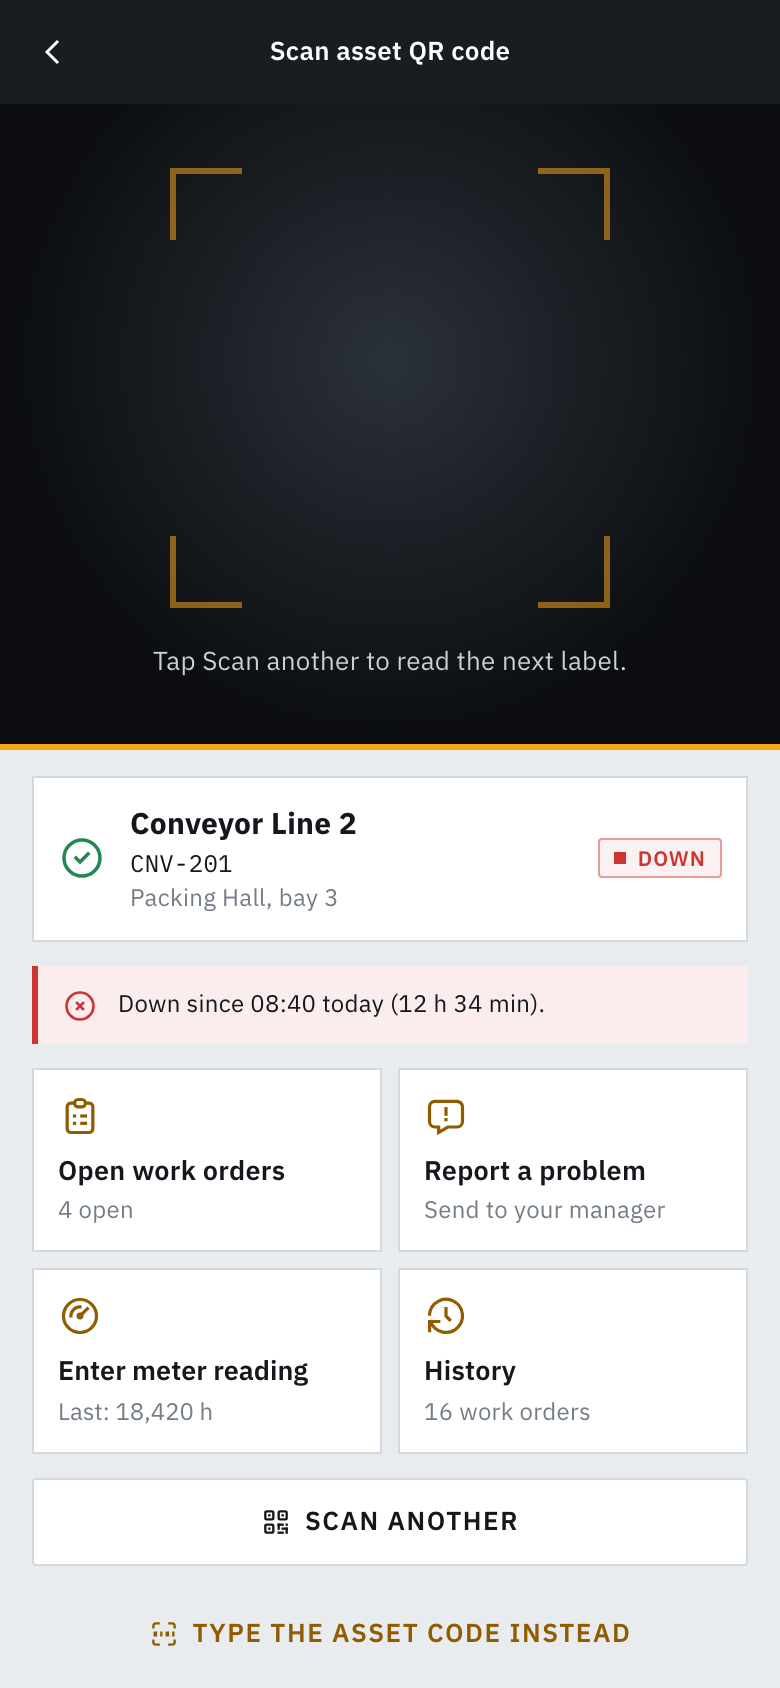
Tap Scan. The camera starts, so point it at the QR label on the machine. When MaintDock finds the asset, it shows the asset with these actions: Open work orders, Report a problem, Enter meter reading, and History. You see only the actions that your role allows. Tap Scan another for the next label. On phones that support it, a flashlight button shows in the top bar. If the camera cannot read the label, tap Type the asset code instead.
Browsers open the camera only on a secure connection. Use your web address with https://. Without HTTPS, type the asset code instead. The browser also asks once for permission to use the camera. Allow it.
You can also scan a label with the normal camera app of the phone. The QR code opens a link to MaintDock. After sign-in, a phone shows the asset in the phone view, and a computer shows the asset page. People whose role cannot see assets, but can report problems, go straight to the Report a problem form, with the asset filled in.
Notifications
MaintDock tells people about work that needs them. Notifications show under the bell in the top bar, with the number of unread ones. Click one to open the record. Use Mark all as read, or See all notifications for the full list, with the tabs All and Unread. In the phone view, the bell is on the Today tab, and Me > Notifications opens the full list.
When email is set up, notifications can also go out by email. The administrator chooses which events can go out by email, for everyone, in Settings > Notifications. Each person can turn off email for themselves in their notification settings.
| Event | Who gets it | Email by default |
|---|---|---|
| Work order assigned | The person who gets a work order. | On |
| Work order overdue | The assignee of a work order that is past its due date, once a day. | On |
| Work order completed | The person who reported or created the work order, when it is done. | Off |
| New request | People who can approve requests at that site, when someone reports a problem. | On |
| Request approved or rejected | The person who reported the problem, when a manager decides. | Off |
| Low stock | People who manage spare parts at that site, when a part goes below its minimum. | On |
| Purchase request needs approval | People who can approve purchase requests at that site. | On |
| Purchase request approved or rejected | The person who asked for the parts, when a manager decides. | Off |
| Parts received | The person who asked for the parts, when they arrive. | Off |
The daily overdue reminders can be turned off in Settings > Notifications. You do not get a notification about a change that you made yourself.
Users, roles, and permissions
Open Admin > Users and roles. The page has two tabs: Users and Roles.
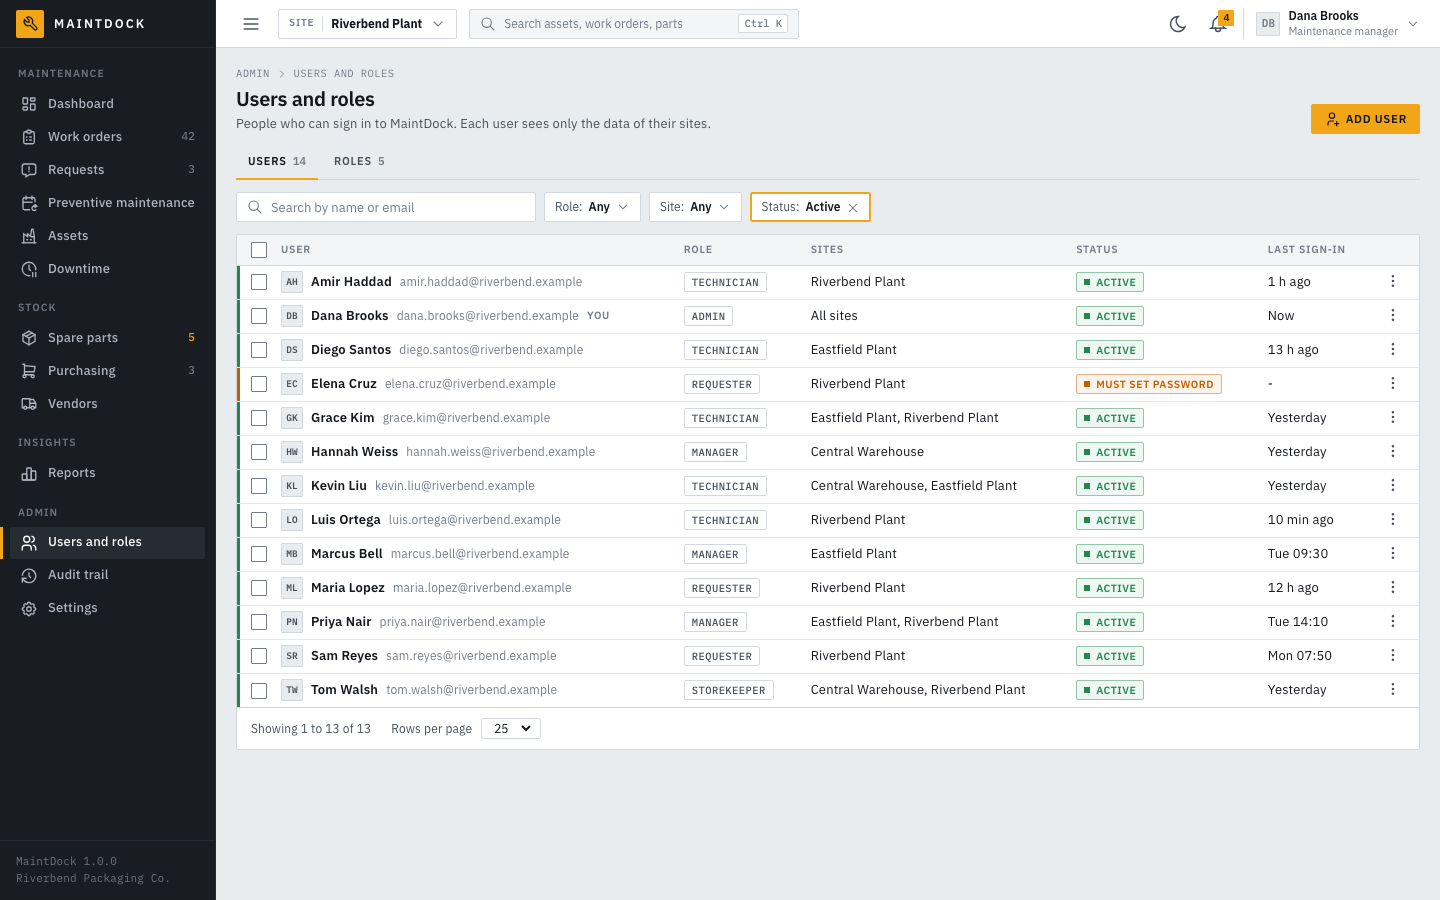
Users
- The list shows each user's role, sites, status, and last sign-in. The status is Active, Disabled, or Must set password (the user has not chosen a password yet). Search by name or email, and filter by Role, Site, and Status. By default, the list hides disabled users.
- Add user is described in First steps.
- The actions of a user are Edit, Send invitation again (or Send password reset link, when the user already has a password), Enable or Disable, and Delete. Select rows with the check boxes to enable or disable many users at once.
- Disable a user who leaves. A disabled user cannot sign in, and open sessions end within a few minutes. The history stays. A user with work orders, requests, or other history cannot be deleted, only disabled.
- Only an administrator can change an administrator or give the Admin role. You cannot change your own role or sites, and you cannot disable or delete your own account. MaintDock always keeps at least one active administrator.
- A user who is not an administrator, but can manage users, can only give a role whose permissions they have themselves, and only the sites they can access. They also cannot change a user whose role has permissions they do not have.
Built-in roles
MaintDock has 4 built-in roles. They cannot be deleted or renamed. You can change the permissions of Manager, Technician, and Requester. The Admin role always has every permission, on all sites.
- Admin: full access to everything, on all sites.
- Manager: plans and approves maintenance work, purchasing, and stock. By default, everything except users, roles, and settings.
- Technician: works on work orders, logs time and parts, and reports downtime.
- Requester: reports problems from the phone view or the desktop, and follows the requests of their sites. For example operators and office staff.
The default permissions of each role:
| Area | Admin | Manager | Technician | Requester |
|---|---|---|---|---|
| Maintenance | ||||
| Work orders | V C E D A | V C E D A | V C E | - |
| Requests | V C E D | V C E D | V C | V C |
| Preventive maintenance | V C E D | V C E D | V | - |
| Assets | V C E D | V C E D | V | V |
| Downtime | V C E D | V C E D | V C E | - |
| Stock | ||||
| Spare parts | V C E D | V C E D | V | - |
| Stock adjustments | V C E | V C E | - | - |
| Purchase requests | V C E D A | V C E D A | V C | - |
| Purchase orders | V C E D | V C E D | - | - |
| Receiving | V C | V C | - | - |
| Vendors | V C E D | V C E D | - | - |
| Insights | ||||
| Reports | V | V | - | - |
| Export to Excel | V | V | - | - |
| Admin | ||||
| Users | V C E D | - | - | - |
| Roles | V C E D | - | - | - |
| Settings | V | - | - | - |
| Audit trail | V | V | - | - |
V = View, C = Create, E = Edit, D = Delete, A = Approve, - = no access.
Some permissions do more than their name says:
- Work orders: Approve closes completed work orders and reopens closed ones.
- Requests: Edit approves and rejects requests. Requests have no separate Approve box.
- Purchase requests: Approve approves and rejects purchase requests.
- Settings: View lets the user see and change the settings.
- Export to Excel: View lets the user export lists to Excel.
Custom roles
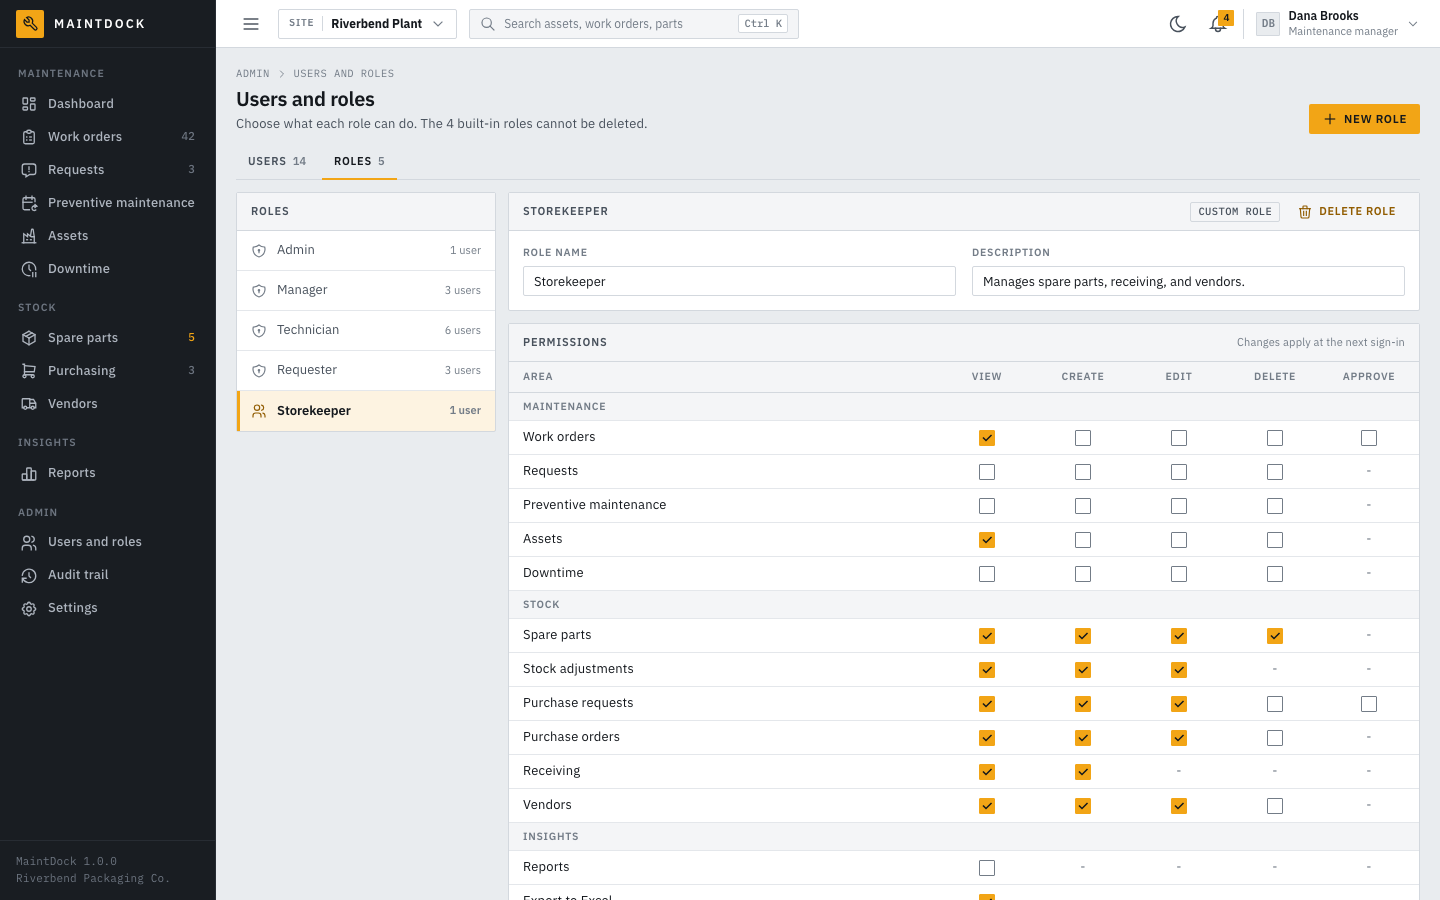
- Open the Roles tab and click New role.
- Enter a role name (for example Storekeeper) and a description.
- Tick the permissions in the matrix. The columns are View, Create, Edit, Delete, and Approve. A dash means the action does not exist for that area. You can only give permissions that you have yourself.
- Click Save role. Then give the role to users on the Users tab.
Changes to a role apply when its users sign in the next time. MaintDock ends their open sessions within a few minutes, so they sign in again soon. A role that still has users cannot be deleted (Delete role). Give them another role first.
Site access
Each user sees only the data of the sites they are given, in every list, report, and search. Give sites in the user dialog, or tick All sites (the user then also sees sites that you add later). Admins always see all sites. Vendors and the spare parts catalog are shared by all sites, but the stock is per store, and each store belongs to a site.
Audit trail
The audit trail records every change in MaintDock: who made it, when, and what changed. It also records sign-ins, sign-outs, failed sign-ins, and exports. Entries cannot be edited or deleted. Open Admin > Audit trail. It needs the permission Audit trail: View.
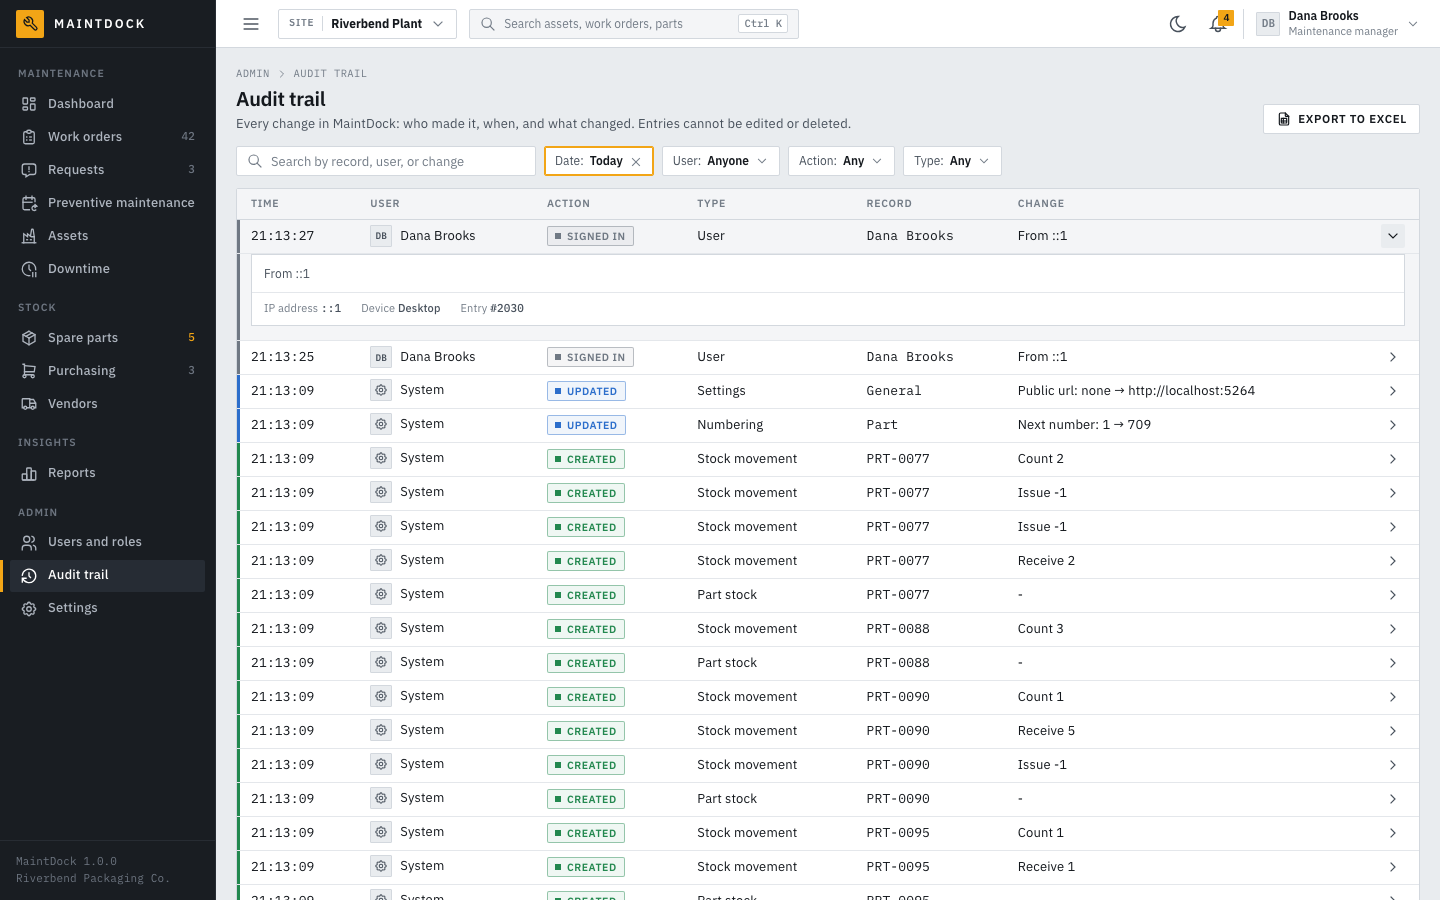
- Search by record, user, or change. Filter by date (Today, Yesterday, Last 7 days, Last 30 days, or a custom range), user, action, and type. The date filter starts on Today.
- Click a row (or the arrow at its end, Show changes) to see each changed field with its old and new value, the IP address, and the device (Desktop, Phone view, or System).
- Changes made by background tasks, such as preventive work orders, show the user System.
- Export to Excel exports the entries that match the filters, up to 100,000 entries. Use the filters to export the rest.
Settings
Open Admin > Settings. It needs the permission Settings: View. The settings apply to all sites. When you change a value, a bar shows at the bottom of the page with Discard and Save changes. If you leave the page with unsaved changes, MaintDock asks first. Sites are saved in their own dialog. The picture is in First steps.
| Section | What you set there |
|---|---|
| General | Company: name, email (shown on purchase orders and in emails), address, public web address, and logo (PNG or JPG, up to 1 MB). The logo shows at the top of the work order, purchase order, and report PDFs. Region: time zone, date format, time format (24 or 12 hours), first day of the week, and language. Work orders: ask for a note when a work order is put on hold (on by default); start downtime when a request says the machine is stopped (on by default); ask for a photo before a work order is completed (phone view only, off by default); when to create preventive work orders (on the due date, or 1 to 30 days before, 7 days by default); close completed work orders after 1 to 30 days, or never (the default, so a manager closes them); and the priority of new work orders (Medium at first). Downtime causes: add causes, mark them planned, turn them off, and change their order. Causes stay in the history, so they cannot be deleted. |
| Sites | Add and edit sites and their stores (Add site, or the pencil of a site). An inactive site is hidden from lists and pickers, and its records stay. A store can be turned off in the same way. Areas are added on the Assets screen. |
| Email (SMTP) | The mail server, the sender, and a test email. See Set up email. |
| Notifications | Which notifications also go out by email, and the daily overdue reminders. See Notifications. |
| Numbering | The prefix, the next number, and the number of digits for work orders (WO-1001), requests (REQ-0001), purchase requests (PR-0001), purchase orders (PO-1001), and spare parts (PRT-0001). The next number cannot be one that a record already uses. |
| Asset labels | Show the company name, show a barcode, the hint text (up to 120 characters, or empty to hide it), and the label width (30 to 150 mm) and height (15 to 100 mm). A preview shows the label. |
| Files | The largest file size for uploads (10 MB by default, up to 200 MB) and the allowed file types. The page also shows the storage folder. You set that folder in appsettings.json (Files:StoragePath). |
| Currency and units | The currency code and symbol, the symbol position, and the decimals. The meter unit for run time (for example h or km), and the availability target in percent. |
Your profile, password, and notification settings
Click your name in the top bar.
- My profile: your full name, job title, phone, and email. You sign in with this email, so after a change you sign in with the new email. Only an administrator can change your role, sites, and hourly rate.
- Change password: enter your current password and a new one (at least 8 characters, with a number, a lowercase letter, and an uppercase letter). Other browsers and phones where you were signed in must sign in again.
- Notification settings: turn Send my notifications by email too on or off, and see which events notify you.
Forgot your password? Click Forgot password? on the sign-in page. MaintDock emails you a link to choose a new password. The link works for one day. MaintDock sends at most one link every 5 minutes, so if you ask again soon, use the link you already have. This needs email and the public web address in Settings > General. If one of them is not set up, ask your administrator to make a password reset link for you on the Users page.
Wrong password too often? After 8 wrong passwords in a row, MaintDock locks the account for 15 minutes. Wait, then sign in again.
Light and dark mode
Click the moon or sun button in the top bar to switch between light and dark mode. In the phone view, use the same button or Me > Dark mode. MaintDock remembers your choice in this browser. Until you choose, it follows the setting of your device.
Global search
Press Ctrl + K (Cmd + K on a Mac), press /, or click the search box in the top bar. Type at least 2 characters of a number, a code, or a name. MaintDock finds work orders, assets, requests, spare parts, purchase orders, and vendors in all your sites, as far as your role allows. Use the arrow keys to move, Enter to open, and Esc to close.